by Marie | Mar 12, 2017 | Banking Setup & Management, Bookkeeping 101, QuickBooks Online, Reconciliations, Troubleshooting
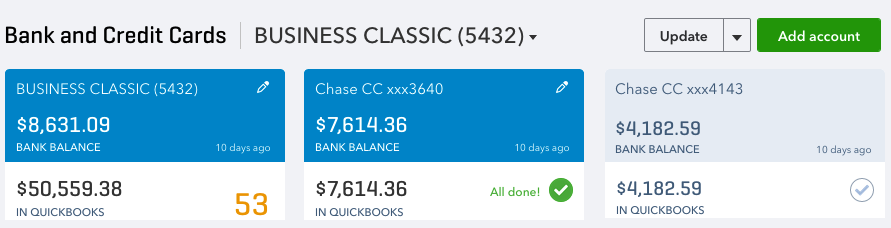
This is one of the most common questions I get asked by new QuickBooks Online users, and you may be surprised to know that more often than not, both bank and QuickBooks balances are never matched simultaneously. However, if you have updated your bank downloads, reviewed and added them all to the QuickBooks register for a specific period or timeframe, and your balances are not matching there may be cause for concern. Here are three main reasons why your actual bank balance does not equal the bank balance in QuickBooks Online.
- You or someone else may have manually added some transactions to QuickBooks and then added them again from the download screen. (This is one reason why it is important to establish and use only one method of inputting your transactions in QuickBooks which is either a) adding transactions via the QuickBooks banking download option, or b) manually adding individual transactions. Adding transactions via the download option is my personal preference and recommendation, as it saves time as well as minimize data entry errors. Subsequently, if you are reconciling your account and realize there are transactions missing that were not downloaded, you can manually enter those missing transactions that are on your bank or credit card statement but not in QuickBooks. It’s very rare for this to happen, but it does!)
- You have manually written check(s) directly in QuickBooks and those checks have not yet been presented to your bank to be cashed. (This will cause your QuickBooks balance to be less than your actual bank balance by the check or checks amount.)
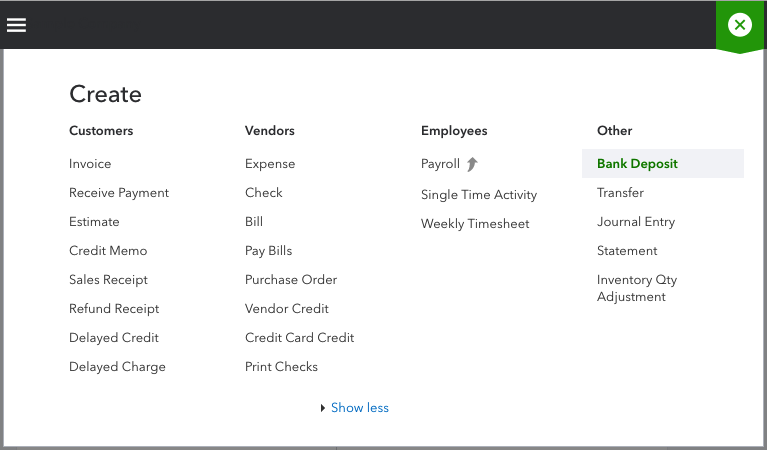
- You have received and applied customer payment(s) to their Invoices in QuickBooks, and also deposited them to the bank account in QuickBooks; however, you have not yet deposited those payments to your actual bank account or you have but they are not yet recorded by your bank. (This will cause your QuickBooks balance to be more than than your actual bank balance by the total of the deposit(s). (When you receive customer payments, you want to apply them to their respective Invoices for the dates that you receive them; however, you may not always deposit them to your actual bank account on the date that you receive them. This is where the undeposited funds account comes in; use the undeposited funds account to house those customer payments until you actually deposit them to your real bank account. When you have made the deposits to your actual bank account, use the Bank Deposit option at the plus sign top right of screen (as shown in the screenshot below) to transfer those payments in the undeposited funds account to the bank account in QuickBooks.)
How to Ensure Your Actual Bank Account Balance and QuickBooks Bank Balance are in Synch
In addition to the above-mentioned, if you track your cash flow on a daily basis, you will always be able to see what is causing your QuickBooks bank balance and your actual bank balance to be out of synch. Also, it is imperative that you reconcile your bank and credit card accounts regularly – at least on a monthly basis. Reconciliation is one of the most important aspect of accounting, and as such, reconciling your bank and credit card accounts on a monthly basis is the foundation of keeping healthy data and maintaining accurate books. Here are some mistakes that reconciliation can help you uncover:
- Missing transactions
- Duplicate transactions
- Transactions entered in error
- Transactions entered to the wrong period or bank/credit card account
- Incorrect transaction amount entered in QuickBooks
- Incorrect or no opening bank balance entered in QuickBooks
- Transactions previously reconciled have been changed or deleted
So, there you have it! The three (3) main reasons why your QuickBooks bank balance and your actual bank balance are not matching, and what you can do about it. Feel free to leave your questions or comments below.
by Marie | Oct 2, 2016 | Banking Setup & Management, Chart of Accounts Setup & Management, QuickBooks for Mac, QuickBooks for Windows, QuickBooks Online

First, I want to say that you need to be absolutely sure that both accounts are for the same bank account before making the merge. Once merged, it cannot be un-merged! Also, if you are using a desktop edition of QuickBooks, do make a backup before proceeding with this merger. It is good practice to make a backup copy before doing anything major in your QuickBooks company file.
How to Merge Two Bank Accounts in QuickBooks
First you’ll want to go to the Chart ofAccounts and select the bank account that you want to be gone. Next, edit this account and make the spelling of the name be the exact as the one you are keeping. (A pop up box will open with a message “This name is already being used. Would you like to merge them?”) Answer Yes then Merge Accounts if asked, and your bank accounts will be merged.
- Go to List and select Chart of Accounts
- Select the bank account you do not want to keep, and click Edit at bottom left.
- Type the name of the Account you are keeping, the exact way it is on the one you are keeping, and click Ok.
- You will now be asked to confirm if you really want to go ahead with the merge. Answer Yes then Merge Accounts if asked, and your accounts will be merged.
Note: This is the same method used to merge other chart of accounts, vendors, or customers.
by Marie | Mar 26, 2016 | Banking Setup & Management, Bookkeeping 101, Deposits & Undeposited Funds, Invoicing & Receivables, QuickBooks for Mac, QuickBooks for Windows, QuickBooks Online, Reconciliations
In order to use the undeposited funds correctly, it is important to understand how it really works. What are undeposited funds? Think of the Undeposited Funds account as an envelope where you keep checks until you take them to the bank. If you deposit more than one check or payment in a group deposit, you can enter those transactions so that your Bank Register matches your Bank’s monthly statement.
How to Accurately Use the Undeposited Funds Feature in QuickBooks
To use the undeposited funds accurately:
- When you record each customer payment, choose Group with other undeposited funds instead of Deposit to a Bank account.
- When you have all the checks entered and you are ready to actually deposit them in your bank, use Bank Deposits which is found under the Plus Sign Icon at the top of QuickBooks Online. In the desktop versions, go to Banking in the menu bar, and select Make Deposits.
- In the Bank Deposits or Make Deposit screen, click the drop-down to select the bank account you would like to deposit the funds to. This would of course be the bank account that you actually put the money in.
- Select the appropriate Date, and class or location if you are using them.
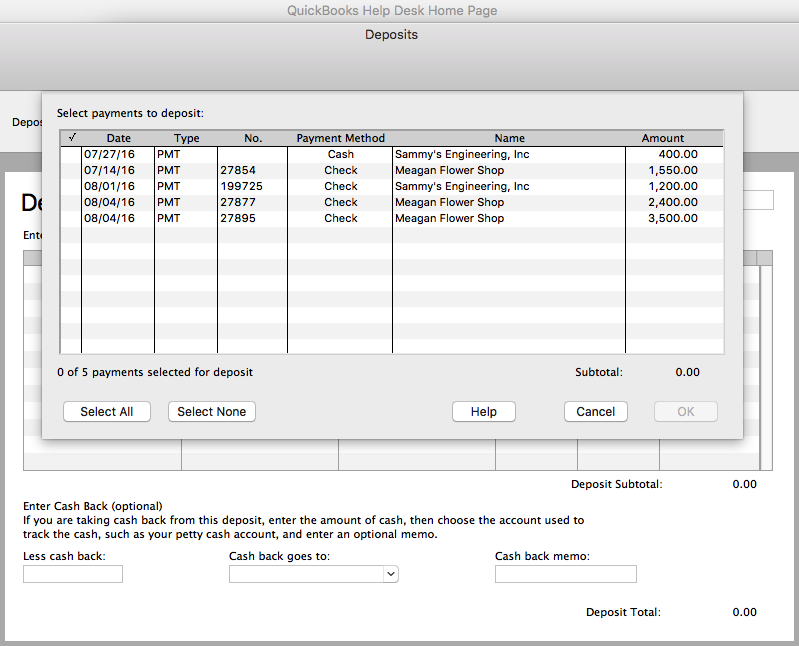
- You will see a Payments section. These payments listed are the ones you recorded and marked to go to undeposited funds. You can now select which of these payments should be included in this deposit to reflect the lumpsum deposit that was actually made to the bank.
- Click Save.
In order for this process to be successful, you must remember to go to the Bank Deposits window (in QuickBooks Online) or the Make Deposit window (in the desktop versions – Pro, Premier), and deposit the monies to the bank register in QuickBooks. Otherwise, they will just sit there, and if someone else is doing the reconciliations at the end on the month, they may actually enter those payments again directly to the bank register without realizing or even knowing that they were already in the Undeposited Funds account.
As you can see, there are still deposits in your undeposited funds account because the proper procedure was not followed. If the accounts were already reconciled for the period in which the transactions in the undeposited funds account relates, then the entries were entered twice – incorrectly increasing the revenue and may require an amended tax return to be filed if the tax for that period was already done.
I have explained indepth how to correct this in my articles:
by Marie | Mar 26, 2016 | Banking Setup & Management, Bookkeeping 101, Deposits & Undeposited Funds, Invoicing & Receivables, QuickBooks for Mac, QuickBooks for Windows, QuickBooks Online, Reconciliations

The main purpose of the undeposited funds feature in QuickBooks, is to give users the option of receiving customer payments and applying them to their Invoices on the dates received, while having a place to house them until they are ready to be deposited to the actual bank account. This is called “grouping deposits” in QuickBooks to reflect the lumpsum deposit that was made on a particular date. The undeposited funds feature can be a huge time saver, especially when it comes to reconciling bank accounts. You should absolutely use the undeposited funds feature:
- If you do not deposit each payment received from customers individually. If each deposit is done separately at the bank such as payments received from PayPal, Square, Shopify etc., there is no need to use the undeposited funds feature. If you receive customer payments via check or cash and you combine them to make one deposit into your bank account, then you need to post the individual payments to undeposited funds first. You will later go to Make Deposits and select the customer payments that made up the total deposits that were actually deposited on a specific date. You will need to ensure you change the date for the deposit in the “Make Deposit” window to reflect the date the deposits actually went into the bank. So, you use the undeposited funds when more than one payment is included in a deposit. That way the deposit in QuickBooks matches the deposit on your bank statement which will make it easier when it’s time to reconcile the bank account.
If you do not use the undeposited funds, then the amount is recorded directly in the check register. So, if you actually deposited several checks at once, you can imagine what a nightmare it becomes when you try to reconcile the checkbook. It creates lots of extra work – needlessly. If you use undeposited funds, then you “make deposits” that match the deposits you sent to the bank, which makes life much easier!
- When checks are received and not immediately deposited in the bank. This way, you will know the day the checks arrived and the day they were deposited. Using the undeposited funds feature in this case, will allow you to record the customer payments for the date in which they were received, and thus show accurate customer receivables while at the same time being able to deposit them on the date they were actually deposited. Without using the undeposited funds, it may be difficult to figure out what payments in QuickBooks make up what deposits on the bank statement when it’s time to reconcile the bank account.
When all is said and done, it is better to use the undeposited funds feature for all deposits, than to not use it for any deposits at all – especially deposits of more than one customer payments. You will have a more seamless, less time-consuming reconciliation process which is super important.
How to clear undeposited funds that were entered in error
If “in error” you mean that the transactions were to be sent directly to the bank account register instead of the undeposited funds account, then you can correct this either by: a) locating and editing the individual payments in question and changing the “Deposit to” field to the bank account. Or, b) you can deposit each payment in the “Make Deposit” window to the bank account by checking each one and changing the date to reflect the date it was actually deposited.
If “in error” you mean that the deposits were doubly entered; once directly in the bank via the check register, and again in the undeposited funds account, the cleanest, but also most time-consuming way to clear these items from the undeposited funds account or “Make Deposit” window is to open the corresponding deposits that were made without selecting from undeposited funds, click on the green Payments button, add the payment from undeposited funds, and then delete the incorrect payment that was entered. As long as the total deposit is unchanged, it will not unreconcile the previous reconciliations. However, if there are a lot of transactions in the undeposited funds account, it could take a really long time trying to resolve this. Why can’t I just delete them? You may ask. It is never okay to just delete anything from QuickBooks without knowing what other accounts and transactions may be affected. These customer payments in the undeposited funds account or make deposit window, may have been applied to Invoices. Deleting them will throw the accounts receivables out of balance, leaving the customers owing more in QuickBooks than they actually do in reality.
Bear in mind that most people who bypass undeposited funds use a revenue account to make the deposits, which means the revenue is possibly overstated – if those deposits are again applied to Invoices and are sitting in the undeposited funds account. So if you are trying to correct a period that you have already filed tax returns for, you will need to discuss this with your tax professional. You may need to file an amended tax return.
by Marie | Mar 26, 2016 | Banking Setup & Management, Bookkeeping 101, QuickBooks for Mac, QuickBooks for Windows, QuickBooks Online, Reconciliations
The way in which you handle a beginning balance that does not match your statement depends on whether or not the account has ever been reconciled in the past. If it has never been reconciled, you can change the opening balance by following these steps:
- Go to List in the menu bar and click Chart of Accounts.
- Double-click the account in question to open to the register.
- Locate the account’s opening balance transaction which is usually the first transaction in the register or look for the Opening Balance Equity in the Account field of the register.
- Change the amount to the correct opening balance that is on the bank or credit card statement.
- Click Record.
You may have entered your opening balance incorrectly. An opening balance transaction is created when you create a new account. You may have added a bank account during the EasyStep Interview, or you may have created a bank or credit card account at any time after the interview. Following the abovementioned steps will get your opening bank balance in Quickbooks on par with your bank account balance for that period.
If the account has previously been reconciled – at least once, and the opening balance was ok then, you need to locate the discrepancy. In this case, you cannot just change the beginning balance; you need to find out why the beginning balances are different. Some reasons that may cause the discrepancy are:
- You may have uncleared a transaction directly in the account register by mistake. If you do this, your beginning balance will be off by that amount. You will be able to see this in the Reconciliation Discrepancy report if one is available in your version and edition of QuickBooks. Otherwise, you could run a report to view the transactions that are unreconciled for that period, and try to locate them on the statements. Hopefully, there aren’t many unreconciled transactions for that account in the period in question.
or
- You have changed or deleted a previously cleared transaction that you have already reconciled. To fix this, you will need to undo the previous reconciliation, then reconcile again with the correct transactions. If the option is available to undo the previous reconciliation in the reconcile window, then undo all the previous reconciliations to the date where both the bank or credit card statement and the QuickBooks beginning balances are the same. If the undo previous reconciliations option is not available in that version and edition of QuickBooks, you will need to go to the Bank or credit card account register and uncheck the transactions one by one.
by Marie | Mar 19, 2016 | Banking Setup & Management, Importing Files & Forms To QuickBooks, QuickBooks for Mac, QuickBooks for Windows, QuickBooks Online, Reconciliations
Obviously, if you are merging two bank or credit card accounts, it means they are for the same credit card or bank account. You have either lost or misplaced your credit card and have received a new one, or have had your current bank account changed due to fraud, etc. and now having trouble with the banking downloads in QuickBooks.
Not sure why merging two bank or credit card accounts unreconciles previous reconciliations in QuickBooks, but it does. So, if there are a lot of transactions in the old credit card account, do not use this method. Instead, create a new bank or Credit Card account, move the balance over and make a note in the old account to indicate that it is the old one. When you link this new bank or CC account in QuickBooks with the bank or credit card company, all the new transactions will come in so you can reconcile from there. This is the best option as it does not change previous reconciliations in any way.
How to Merge Credit Card Accounts That are Setup for Online Banking
Before you embark on this merger, be sure that there are no pending transactions to send and no unmatched transactions in the old account. Also, do not deactivate the old account from online banking services. Deactivating online services can cause errors to occur during the merge process.
1) Create a new account:
a) From the Company menu, click Chart of Accounts
b) In the Chart of Accounts, click the Account drop-down and select New
c) In the Add New Account window, choose Bank and click Continue
d) Enter a name for the account. (Be sure to give the account a new name. You can change the name back when you have completed the merge)
e) Click Save & Close
2) Set up Online Banking and connect the new account to the appropriate financial institution
3) Accept any transactions that downloaded and record them into the register
4) You should now have both accounts connected for Online Banking. To avoid issues, you must merge the old account into the new account
5) In the Chart of Accounts, select the old account that will be merged into the new account, click the Account button in the lower left corner of the window, then select Edit Account
6) Change the Account Name to the exact name of the new account that you are merging into
7) Click YES when prompted by the Merge warning dialog box
8) The new account should have the entire transaction history of the old account along with any newly downloaded transactions
9) If appropriate, you can now rename the new account to the most appropriate name:
a) If you performed the merge because your credit card company has changed names, then name the account whatever is most appropriate for the credit card company new name
b) If you performed the merge because you are switching from direct connect to web connect (or vice versa) or as a troubleshooting step, then it may be appropriate to change back to the original account name
10) Because previous reconciliations were undone by the merge, mark all transactions as cleared, then refer to the previous reconciliation record that you saved from the old account and uncheck those transactions that were not previously reconciled as well as any new transactions downloaded when the new account was created.
11) Re-create pending transactions and recurring or memorized transactions as appropriate.
by Marie | Feb 26, 2016 | Banking Setup & Management, Bookkeeping 101, Deposits & Undeposited Funds, QuickBooks for Mac, QuickBooks for Windows, QuickBooks Online, Reconciliations
Since the accounts were reconciled for the period in which the deposits relate, it means that the same revenues were reentered directly to a bank account register without realizing that they were already entered, and are in the “undeposited funds” account waiting to be deposited to the bank from there.
The fix will depend on the number of transactions involved. If not many deposit entries, here is what you do:
 Few Deposits Fix
1) Locate the previous corresponding deposits in the bank account register and make note of their dates.
2) Make sure they are each the same amount as the deposits in the “Make Deposit” window. (You want to keep the deposits in the month they belong so as not to throw off the previous reconciliations).
3) Check to ensure that the dates in the “Make Deposit” window match the dates in the register, or at the very least, are in the same month. (The aim is to remove the entries from the “make Deposit” window without throwing off the previous reconciliations).
4) Now, go ahead and make the deposit(s) from the “Make Deposit” window for each amount(s) that were previously entered in the register, making sure you change the deposit date to reflect the previous deposit in the register as well.
5) Go back to the bank register and delete the previous deposits that were reconciled. (NOTE: Your deposits that you just made from the “Make Deposit” window should be shown either above or below the previous corresponding deposit with the same date).
6) Next, for QuickBooks Mac Pro or QuickBooks Online: checkmark each corresponding deposit that you have just deposited, as reconciled. (With the exception of the switching of the deposits, the previous reconciliations will remain the same, with accurate opening balances for each month). For QuickBooks Windows Pro/Premier: undo the previous reconciliation(s) to the first month affected by the deposits you deleted, and re-reconcile from there onward. All the deposits you entered will be there in the reconcile window for you to check off, and you will be in balance in minutes if you deposited them all accurately. (You can use the “Mark All” feature in the reconcile window by checking the box “Hide transactions after statement end date” and clicking “Mark All”. In most cases, this will reconcile the account for that month and show a $0 difference in the reconcile window. If there is a difference, and it is not obvious what amount(s) is throwing it off, use the “Unmark All” button and reconcile one by one with the statement.)
As you can see, if the deposits in the “Make Deposit” window are a lot – possibly spanning multiple years, the above-mentioned method of clearing the deposits from the “Make Deposit” window would be very time consuming and impractical.
If there are a multitude of deposits here is what you do:
Too Many Deposits Fix
1) First, you want to check to see if the deposits that were previously entered directly into the bank register that made the accounts reconcile, and the invoice that the payments in the “Make Deposit” window are for, went to the same Income account. So, locate the previous deposits as well as the corresponding Invoice(s) and check to see where they went. (If there is only one Income account, then they most likely went to the same account).
2) Go ahead and make the deposit(s) for each year, using the year end date for each year’s total deposit. (It’s always good practice to make adjustments at the beginning or ending of a period).
3) Next, create a journal entry for each year end with the total deposit amount you just put in for each year.
- Debit the Income Account associated with the deposit(s)
- Credit the bank account that the deposits were made to
This will reduce the amount in the bank account as well as the Income account – as it should, and the “Make Deposit” window will now be cleared. When next you go to reconcile, the journal entry amounts for the deposits will be in the reconcile window. Check each on the debit and corresponding credit side to remove them from the reconcile window. This of course will be a zero effect on your current reconciliation.
Because there were transactions left in the undeposited funds, the revenue for the period(s) associated with those deposits were overstated. It is possible that they were already taken care of by the CPA or tax preparer as far as tax filing; however, you will need to bring this to their attention if taxes were already filed for the affected period(s). Although you have already corrected this on the books in QuickBooks, amended returns may need to be filed, to make the correction tax-wise.
Using the “Too Many Deposits Fix” option above will allow your financials to be accurate, but not your books in the sense that the deposits were not broken down in months which will throw monthly reports off. Using the “Few Deposits Fix” option above will allow your books as well as your financials to be accurate on either the cash or accrual basis.
by Marie | Feb 23, 2016 | Banking Setup & Management, Bookkeeping 101, QuickBooks for Mac, QuickBooks for Windows, QuickBooks Online, Reconciliations
If you are using QuickBooks Pro for Mac or Windows, go to Banking then Reconcile and select the bank account you are looking to reconcile from the dropdown menu. (If you are using QuickBooks Online, click on the gear icon at top right of screen where your company name is, then Reconcile and select the bank account from the dropdown menu).
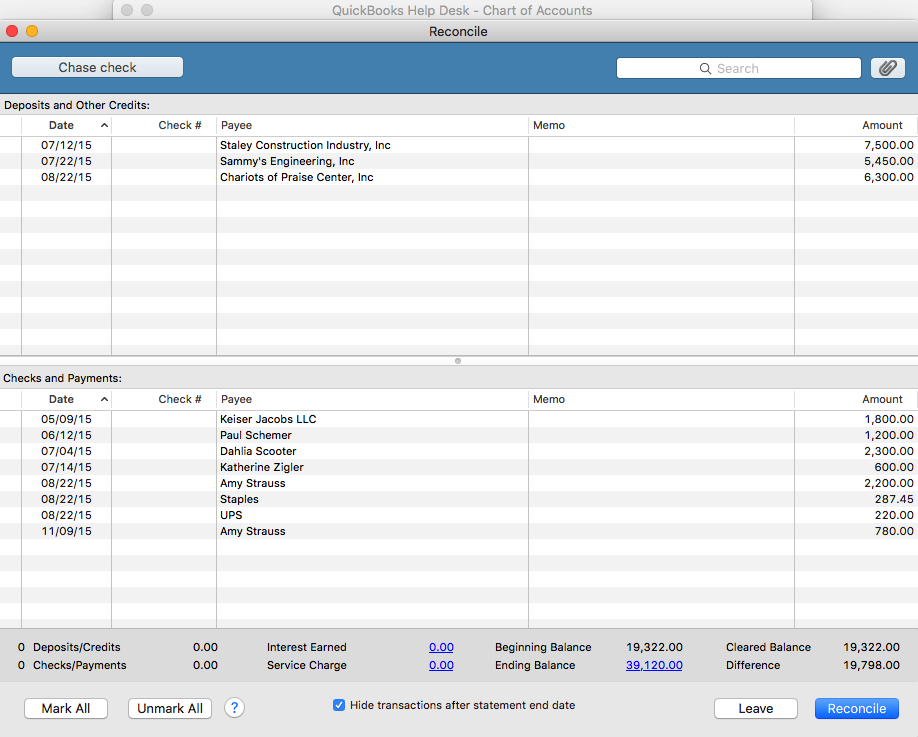
Next, enter the statement ending date and the statement ending balance, and the bank service charge and interest earned – if any. The beginning balance should be the same as the beginning balance on the statement. If it is the same, click ok and start your reconciliation process. Click on each item that matches with the same item on the statement for both debits and credits. You may also check the button that says, “Hide transactions after statement end date” then select “Mark All”.
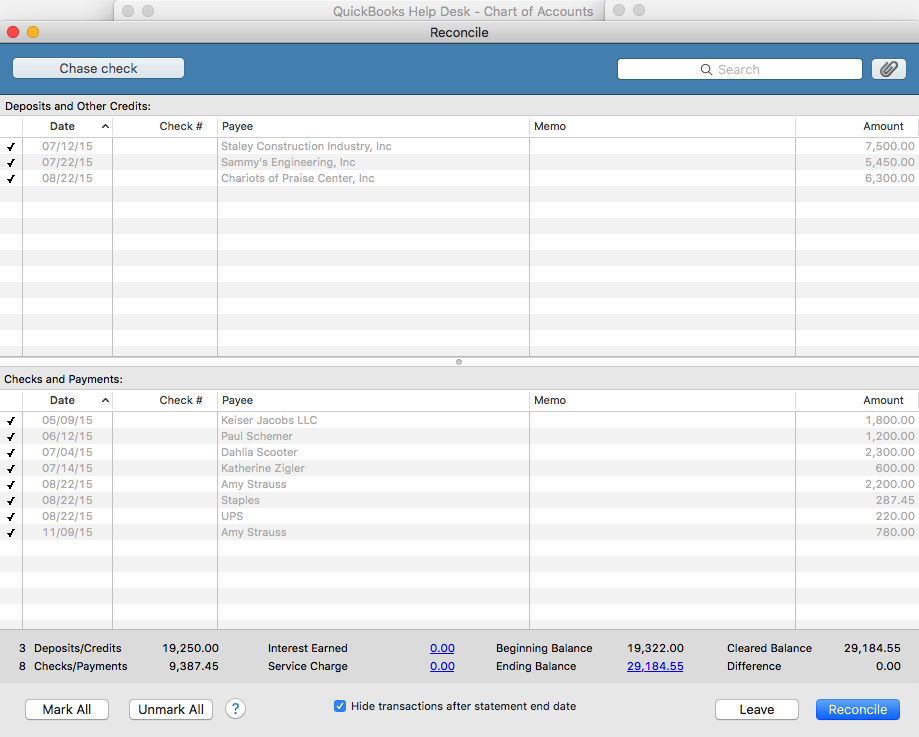
When your account is reconciled, there should not be a difference. The amount at the “Difference” button should show $0.00. If it shows a balance, it means that there is a discrepancy, and you will need to go over each transaction to locate the discrepancy. The difference could be one or more transactions that are entered with the incorrect amount such as $2,900 entered as $2,090, or a transaction entered on the debit side when it should have been on the credit side – and vice versa.
Also, a good thing to do at this point, is to double check to ensure the beginning and ending balance in the reconcile window matches with the beginning and ending balances on the bank statement. You may click the “Unmark All” button so you can mark them individually as you cross check each item with your statement.
If you recognize the transaction that is causing the discrepancy, and feel that you have already entered it, use the “Find” feature to try and locate it. Go to Edit then Find and search for the amount. It may have been mistakenly entered with the wrong date and thus hiding in another month or period.
If you previously did a reconciliation and it was accurate, and now you want to continue reconciling current months but the beginning balance is off, click on the “Discrepancy Report” button to see what transactions were changed since your last reconciliation. If it was deleted, you will need to reenter it. If it was unchecked in the register – which makes it un-reconciled, you will need to recheck it in the register. After doing so, your beginning balance will be back on par with your statement again.
TIP:
I highly recommend using the “Download Transactions” feature in QuickBooks. Not only will it save you time entering data, but it will help you to avoid entering incorrect transaction amounts as well as making incorrect debit or credit entries.

Recent Comments