by Marie | Oct 10, 2016 | Employee Setup & Management, Printing & Print Customization, QuickBooks Online

To print payroll checks in QuickBooks Online, you will need a payroll subscription in addition to having a QuickBooks Online subscription.
To Print Employees Paychecks in QuickBooks Online:
- Click the Gear Icon at top right of screen (your company name) and select Payroll Settings under the Settings column to start configuring your pay checks. (You will only see this option if you have subscribed for payroll)
- Next click Preferences then Paycheck Printing Settings option to configure how the checks will print.
- Select the preprinted check option – if you are using preprinted checks from Intuit, and check the appropriate Print 1 stub or Print 2 stubs.
- Click Ok, and you will be taken to the Printer Setup screen.
- Next, setup your employees by adding them in the Payroll Setup under Employees. Here you can configure their hourly rates, and choose whether to pay via direct deposit or paper check. You can also configure their deductions, and see a sample view of their paycheck on the right of screen.
- Click Done at bottom right. You will now be taken to the current pay period screen. In this section, you can enter the employee’s hours, and change the pay date. You can click the Preview button at bottom right to display the current pay period’s paychecks, total amounts, with employee taxes and net pay.
- If all looks well, click the Submit payroll button at bottom right and the paychecks will now be ready to print.
- Enter the check number(s) and click Finish payroll.
How to Locate and Reprint a Paycheck in QuickBooks Online
- Click on Reports in left menu bar to take you to the report screen.
- Click on the “Go to report” search bar, and type in Paycheck. The Paycheck List will now be generated.
- Click on the Paycheck List to run the report. When it loads, go ahead and adjust the date range to display the period with the check(s) you need to print.
- Now, checkmark the boxes to the left of the check(s) you need to print, then click the Batch action dropdown at top left and select Print.
You can also go to the individual employee to locate and print their paycheck. Just go to Employees in left menu bar, click the dropdown to the right of the employee and select Run report. Now, click the Customize button at top right, then Filter to choose date and Run report.
You may find these Paycheck Printing videos helpful as well.
RELATED:
by Marie | Aug 25, 2016 | Employee Setup & Management, Payroll Setup & Management, Preferences & Customization

There are several steps needed in order for payroll to flow properly to the job costing reports – especially if you want to include payroll taxes and benefits. The step-by-step instructions below will help guide you through the setup.
You must have a QuickBooks payroll subscription to use these instructions. If you are trying to use job costing with a non-QuickBooks payroll provider, you will not only make your bookkeeping much more time-consuming but also introduce opportunities for errors to be made. QuickBooks offers a complete payroll solution, just like ADP and Paychex, and at a great price too.
Since labor is usually the biggest expense for most companies who are doing job costing, it is vitally important that it be included in your job cost reports. If you don’t include labor, your jobs will seem more profitable than they really are. Even worse, some of them might even be losing money without you even knowing it. This not only affects your present situation, but can lead you to create inaccurate estimates for future jobs.
Here are the steps for setting up payroll for job costing in QuickBooks:
Step 1. Set up Preferences:
- Go to Edit, Preferences, Company Preferences and select Payroll & Employees
- Select “Full Payroll” or “Complete Payroll Customers”
- Check “Job Costing, Class and Item tracking for paycheck expenses”
- Go to Time & Expenses
- Select Yes under “Do you track time?”
- You may also want to check “Create invoices from a list of time & expenses”
Step 2. Set up Payroll Items:
- Go to Lists, Payroll Items
- Next, edit every Addition and Company Contribution item to ensure that “Track expenses by job” is checked
- Payroll items can only be mapped to one expense account, so you may want to setup separate ones for Cost of Goods Sold (COGS) and overhead payroll expense
Step 3. Set up Employee Records:
Step 4. Set up Default for New Employees:
- Go to the Employee Center and select Manage Employee Information, then Change Employee Default Settings
- Check “Use time data to create paychecks”
Step 5. Set up Workers Comp:
- Go to Employees, Workers Compensation, then Setup Workers Comp
- Setup your workers comp codes at Employees, Workers Compensation, then Workers Comp List
- Next, go to Lists, Payroll Items to double-check that the Workers Comp payroll item has “Track expenses by job” checked
Step 6. Using TimeSheets
- Go to Employees, Enter Time, then Use Weekly Timesheet
- Complete all information including both a payroll item & a service item. Mark as billable if you do time & material billing
- You may want to add a customer:job called Overhead, so you will have a place to place other entries in order not to forget to make allocation
- Consider using “Time Tracker” or “WorkTrack Time Card” so employees can enter their own time
RELATED:
by Marie | Aug 24, 2016 | Employee Setup & Management, Reimbursements and Investments

Since QuickBooks does not allow for customer jobs to be added to payroll addition items, you will need to use one of two (2) approaches:
Approach 1:
a) Setup your employee as a vendor
b) Then setup the vendor for direct deposit
Using this method will allow the employee expenses to go into their vendor record which can have job costing. Just remember to create a credit memo to clear the vendor account and place the costs into a clearing account, at the end of the month. The clearing account is cleared in payroll by an item that zeroes out the clearing account.
Approach 2:
a) Uncheck the box next to “Track Expenses by Job” for your reimbursement item
b) Next, prepare a $0 journal entry using the same expense account on both lines but add a customer:job to the the debit and no customer:job to the credit, and mark the debit line as billable.
by Marie | Mar 2, 2016 | Bookkeeping 101, Employee Setup & Management, Payroll Setup & Management, QuickBooks for Mac, QuickBooks for Windows, QuickBooks Online
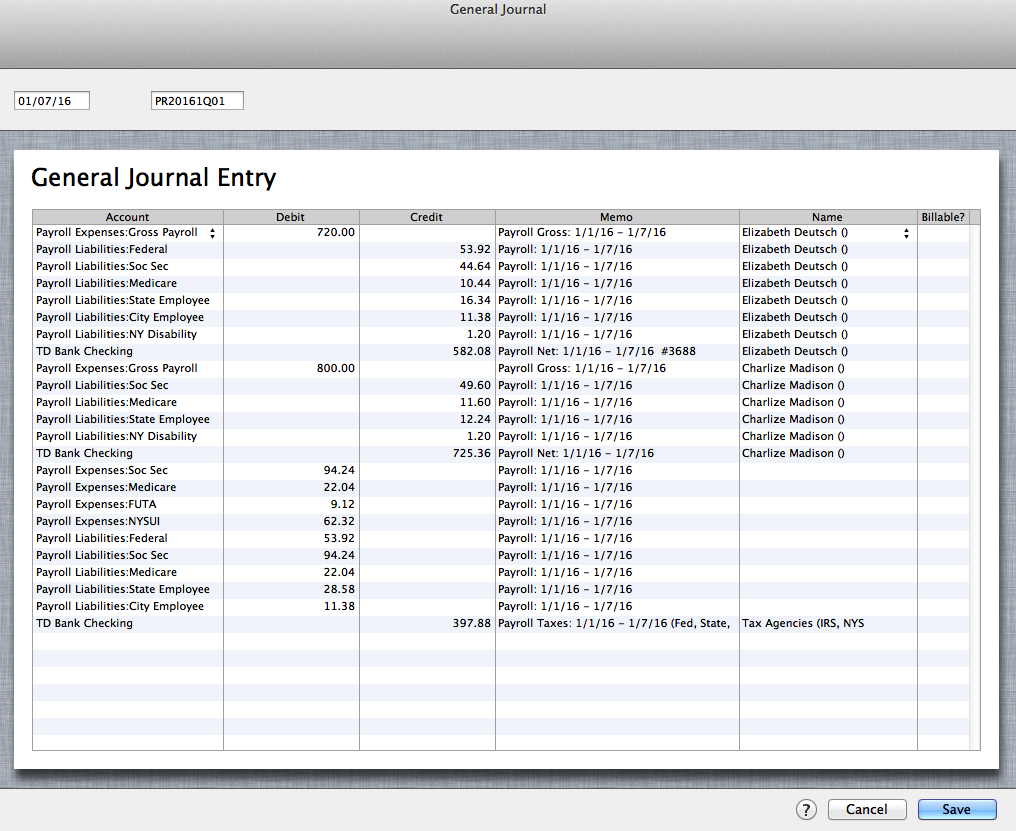
The best and most accurate way to enter third party payroll into QuickBooks is to enter them via Journal Entries. First, you want to setup the expense as well as the liability items of the payroll in the Chart of Accounts. Then you want to enter one journal entry for each pay period, using the payroll items you created in the Chart of Accounts on their correct debit and credit sides, making sure you enter the actual check dates of the paychecks. You will include the employees names in the Name field, and a memo with the pay period as well as net, gross or taxes on each transaction line.
Entering Third Party Payroll into QuickBooks:
 Create the Payroll Expense Items in the Chart of Accounts as sub of Payroll Expenses to record company expenses
Payroll Expenses
Gross Payroll
Soc Sec Company
Medicare Company
FUTA
NYSUI
 Create the Liability Items in the Chart of Accounts as sub of Payroll Liabilities to record employees withholdings
Payroll Liabilities
Federal Withholding
Soc Sec Employee
Medicare Employee
State Employee NYS
City Employee NYC
NY Disability
The Result: (click image to enlarge)

In Bank Register: (click image to enlarge)

Entering third party payroll this way will allow every aspect of the payroll to be accurately accounted for; each paycheck will be listed separately with the gross, employee paid taxes, employer paid taxes, and the net payroll. The paychecks as well as the tax payments made will be easily tracked in the bank account register, and the amounts in QuickBooks will be on par with the third party company figures. Entering third party payroll this way will also make it easily identifiable in the reconcile window when you go to reconcile your bank account, and will show a balance on the balance sheet for any withholding that was not paid over to the relevant tax authority.
RELATED:


 Create the Payroll Expense Items in the Chart of Accounts as sub of Payroll Expenses to record company expenses
 Create the Liability Items in the Chart of Accounts as sub of Payroll Liabilities to record employees withholdings


Recent Comments