by Marie | Apr 26, 2016 | Bookkeeping 101, Importing Files & Forms To QuickBooks, Third Party Applications - QuickBooks Compatible

There are three (3) options to accomplishing this task.
Option 1:
You can backup the file you last used – each time you use it, and restore it to the next computer you will be using. This is highly discouraged! Under no circumstances would I advise using multiple copies of the same QuickBooks data file; however, it can be done. The problem with this is that transferring your QB data file back and forth opens the door for errors, which can be very costly. There is so much that could go wrong! Just imagine that you end up having some data in one file and not in the other, while the other has some data that is not in the one you are currently using. Disaster!
To Backup QuickBooks File to Removable Storage Device:
Go to File, Backup, and select the location of the Removable Storage Device. Then click Backup or Start Backup.
To Restore QuickBooks File from Removable Storage Device:
Open the QuickBooks company file on your computer, and go to File, Restore a backup copy, and confirm “YES” when prompted.
For Mac computer, double click on the QuickBooks file on the flash drive or other storage device with your backup, then drag it to your desktop or location you wish to store the file. QuickBooks Mac Pro does not overwrite previous files, instead it creates new disk images with each new file. Because of this, you want to ensure that you keep careful track of the current file in use. You do not want to be using multiple files, thinking that it’s the same file, but realizing later that pieces of your information are in various QuickBooks files. If you are the only one using this file on both computers, and you insist on getting things done this way, be sure to make a note of the last entry you made along with the date just before you backup each time after using. Then, look if that last entry is in the file you are about to use, before you start updating it with new transactions.
Option 2:
You can establish your office computer as the “primary” data file, and use a remote access program such as Go to My PC to access and work on it from home. This way, the QuickBooks data file on your office computer remains the primary file, while allowing you to update it remotely and thus using one file. The problem with this, is that you will need to leave the office computer on, in order to access it.
Option 3:
There are also hosting options available such as, Swizznet.com where you can store your data and access from anywhere with an internet connection; however, like QuickBooks Online, your “real” data is not on your hard drive. If you are going to use this route, you may be better off using the Online version of QuickBooks.
by Marie | Mar 20, 2016 | Importing Files & Forms To QuickBooks, QuickBooks for Mac, QuickBooks for Windows, QuickBooks Online, Reconciliations, Third Party Applications - QuickBooks Compatible

Reconciling Paypal account in QuickBooks is similar to reconciling a bank or credit card account in QuickBooks. You want to ensure that your beginning balance in QuickBooks matches the beginning balance for the period you are reconciling, and subsequently selecting the period end date then checking off the transactions that are on Paypal transaction printout with its corresponding transaction in QuickBooks.
Manually Entering or Downloading Transactions in QuickBooks Prior to Reconciliation
Depending on the number of transactions you have in Paypal and how you want to track them, will be the deciding factor on the method you use. I have a few clients that need each Paypal transaction to be entered individually because each transaction can be for something different. In this case, I have to produce a Sales Receipt for each one and apply the money to the correct item. I then make a deposit using the Undeposited Funds account just like I would any other deposits.
The one difference is that when you have selected all the items that you are depositing you then need to subtract the total Paypal fees. These should not be subtracted from each person/entity you received funds from because you need to show that you received the full amount of the money. Therefore, on the Make Deposit screen I use the next available empty row to add the Paypal fees. If you have an account that you are using specifically for tracking these, then that account will be used in the From Account column.
In the Memo field you can enter Paypal Fees if you would like, and you can insert “PP” for Paypal in the “Payment Method” field. The key to this working is when you enter the cost for the fees in the “Amount” column, they need to be entered as negative numbers. The total deposit should equal the amount that was transferred from PayPal into your bank account. This way the full cost of whatever was purchased will show in their proper accounts and the proper Expense account will be increased by the Paypal Fees.
If you usually have a lot of transactions for Paypal, you may choose to use Simple Port to import your Paypal transactions to QuickBooks. Once you have set the PayPal download to the correct format you will never have to do it again, and when it is configured correctly, Simple Port imports each transaction as a sales receipt, makes the deposit, and records the PayPal fees. The setup process can be a bit daunting, but they do offer free phone help and support and once they are through, your settings will be perfect and you won’t need to change them again. It has helped me tremendously with clients that have hundreds of Paypal transactions to contend with. Within 30 minutes, I usually get about 600 PayPal transactions into QuickBooks if I have to separate by sales tax jurisdiction, and less than 10 minutes if sales tax is not an issue.
Reconciling Paypal Account With QuickBooks
Now, all you have to do is go to Banking, Reconcile, select the Paypal Account from the dropdown menu, insert the period end date, ending balance and click Ok. Check off each transaction on the statement with its corresponding transaction in QuickBooks. When you are through, the difference at the bottom of the reconcile window should be $0.00. If it is not, then you will need to locate the discrepancy. If you do not see the transactions in QuickBooks, even though they are on the Paypal printout, you will need to manually enter them.
Conversely, if there are transactions in QuickBooks for the period you are reconciling but not on the Paypal printout, you will need to query them and delete or transfer them to the account for which they belong. This can sometimes occur when the download/import is not the option used to enter transactions in QuickBooks.
Note: To get the Paypal report that includes Paypal fees as well as a running balance, go to Activity, Activity (including balance & fees), and run a report for the period.
 How to Download Paypal Transactions to QuickBooks
by Marie | Mar 20, 2016 | Bookkeeping 101, Importing Files & Forms To QuickBooks, QuickBooks for Mac, QuickBooks for Windows, QuickBooks Online, Third Party Applications - QuickBooks Compatible
There are two ways to download Paypal transactions to QuickBooks: 1) via .iif file and 2) via .csv or Excel. I do not recommend the IIF approach as it does not allow for editing before uploading to QuickBooks, and Paypal transactions are not as seamless as bank transactions – they require editing. Instead, export the reports to Excel where you will be able to do the necessary editing before uploading to QuickBooks.
How to Import Paypal Transactions into QuickBooks
- Log in to your PayPal account
- Click the Activity tab, and select your date range
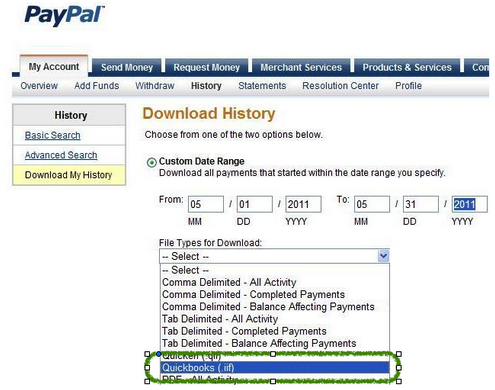
- Click the small Download link to the top right corner of the screen to get to the Download History screen
- Choose your date range, either Custom Date Range or Last Download to Present from the drop-down list
- Choose File Type to Download, file would be QuickBooks (.iif)
- Click Download History
- When prompted to enter the account names, enter the account names exactly as they appear in the Company’s Chart of Accounts:
- Name of PayPal Account
- Name of Other Expenses Account
(Be sure that the expense account being used is not a sub-account of another expense account or it will be turned into a bank account when it is imported into QuickBooks).
(If Accounts Payable balances are being paid by PayPal transactions, you can enter the name of your Accounts Payable account here, but the Vendor names in PayPal must match the names in QuickBooks).
- Name of Other Income Account
(Also, be sure that the income account being used is not a sub-account of another income account or it will be turned into a bank account when it is imported into QuickBooks).
(If Accounts Receivable balances are being paid by PayPal transactions, you can enter the name of your Accounts Receivable account here, but the Customer names in PayPal must match the names in QuickBooks).
Note: You will have to fill in all of the boxes, or you will receive a message from PayPal stating: You must complete the above fields to download your log.
- Save the iif to the desktop
- From the QuickBooks File menu, select Utilities, Import then IIF Files
- Select the iif file located on the Desktop, and click Open
by Marie | Mar 19, 2016 | Banking Setup & Management, Importing Files & Forms To QuickBooks, QuickBooks for Mac, QuickBooks for Windows, QuickBooks Online, Reconciliations
Obviously, if you are merging two bank or credit card accounts, it means they are for the same credit card or bank account. You have either lost or misplaced your credit card and have received a new one, or have had your current bank account changed due to fraud, etc. and now having trouble with the banking downloads in QuickBooks.
Not sure why merging two bank or credit card accounts unreconciles previous reconciliations in QuickBooks, but it does. So, if there are a lot of transactions in the old credit card account, do not use this method. Instead, create a new bank or Credit Card account, move the balance over and make a note in the old account to indicate that it is the old one. When you link this new bank or CC account in QuickBooks with the bank or credit card company, all the new transactions will come in so you can reconcile from there. This is the best option as it does not change previous reconciliations in any way.
How to Merge Credit Card Accounts That are Setup for Online Banking
Before you embark on this merger, be sure that there are no pending transactions to send and no unmatched transactions in the old account. Also, do not deactivate the old account from online banking services. Deactivating online services can cause errors to occur during the merge process.
1) Create a new account:
a) From the Company menu, click Chart of Accounts
b) In the Chart of Accounts, click the Account drop-down and select New
c) In the Add New Account window, choose Bank and click Continue
d) Enter a name for the account. (Be sure to give the account a new name. You can change the name back when you have completed the merge)
e) Click Save & Close
2) Set up Online Banking and connect the new account to the appropriate financial institution
3) Accept any transactions that downloaded and record them into the register
4) You should now have both accounts connected for Online Banking. To avoid issues, you must merge the old account into the new account
5) In the Chart of Accounts, select the old account that will be merged into the new account, click the Account button in the lower left corner of the window, then select Edit Account
6) Change the Account Name to the exact name of the new account that you are merging into
7) Click YES when prompted by the Merge warning dialog box
8) The new account should have the entire transaction history of the old account along with any newly downloaded transactions
9) If appropriate, you can now rename the new account to the most appropriate name:
a) If you performed the merge because your credit card company has changed names, then name the account whatever is most appropriate for the credit card company new name
b) If you performed the merge because you are switching from direct connect to web connect (or vice versa) or as a troubleshooting step, then it may be appropriate to change back to the original account name
10) Because previous reconciliations were undone by the merge, mark all transactions as cleared, then refer to the previous reconciliation record that you saved from the old account and uncheck those transactions that were not previously reconciled as well as any new transactions downloaded when the new account was created.
11) Re-create pending transactions and recurring or memorized transactions as appropriate.

Recent Comments