by Marie | Jun 2, 2019 | Bookkeeping 101, Classes & Location, Preferences & Customization, QuickBooks for Windows

To Turn on Class Tracking in QuickBooks Windows – Pro, Premier, Enterprise:
Step 1. Click on Edit, then Preferences in the main menu to open the Preferences window.
Step 2. Click on the Accounting icon in the left pane of the Preferences window.
Step 3. Select the Company Preferences tab in the right pane.
Step 4. Checkmark the Use class tracking item on the Company Preferences tab.
Step 5. Click OK to close the Preferences window.
Now when you go to generate your Invoices, bills, checks, etc. the class option will be available to use.
by Marie | Mar 18, 2017 | Bookkeeping 101, Customer Setup & Management, Invoicing & Receivables, QuickBooks for Mac, QuickBooks for Windows, QuickBooks Online

Yesterday while consulting with my newest client  , the renowned owner of an upscale beauty Salon here in New York City, she asked a question that I was not expecting to hear asked. Meaning, I thought this would be something everyone knew the answer to. I mean, I did give her an answer, you know explained fully, but not before pausing and digesting it. So, I had to poll my Facebook group on this one, as I often do. Lo and behold, a whopping 68% did not know the difference. I was wrong! I know we all have things in different fields of studies that we are not knowledgeable about but as far as the extent of common knowledge, what is and isn’t, do vary. So, in light of finding that out, I have decided to answer this specific question, “Should I be issuing customers sales receipts or Invoices in QuickBooks?” here so that others may be able to find the answer. That’s what I am about here at Step by Step QuickBooks Tutorial!
So, here’s the deal! If you are a business offering goods and/or services on credit to your customers, or allow for partial payments/payment deposits, then you should create and issue your customers Invoices. This will allow you to track your customers balances for Individual Invoices in the accounts receivables ledger, as well as have a comprehensive view of your total outstanding customer receivables. The Invoice connects the sales transactions to accounts receivables; the sales receipt on the other hand, does not.
If you require full payment at time of sale/service, then you should issue your customers Sales Receipts. Sales Receipts do not affect accounts receivables and thus will not allow for the tracking of any customer balances.
Businesses, such as my client’s beauty salon, that operate on a “buy/now pay/now” basis, do not need to Invoice their customers since they will not need to track payments owing to them – there won’t be any. Instead, they should issue sales receipts which is for the total amount of the sale. Thanks to today’s technological advancement, these businesses have the option of using a Point of Sale system, and most can be linked to an accounting software such as Intuit’s QuickBooks, and have the transactions easily downloaded to QuickBooks instead of manually.
So there you have it! Use an Invoice when you need to track customer balances, and a Sales receipt when you do not.
Don’t forget to like us on Facebook, follow us on Twitter and Linked In, plus One us on Google +, and leave a comment right here on this blog. Tall order, thank you!
by Marie | Mar 13, 2017 | Billing & Payables, Bookkeeping 101, QuickBooks for Mac, QuickBooks for Windows, QuickBooks Online, Troubleshooting, Vendor Setup & Management
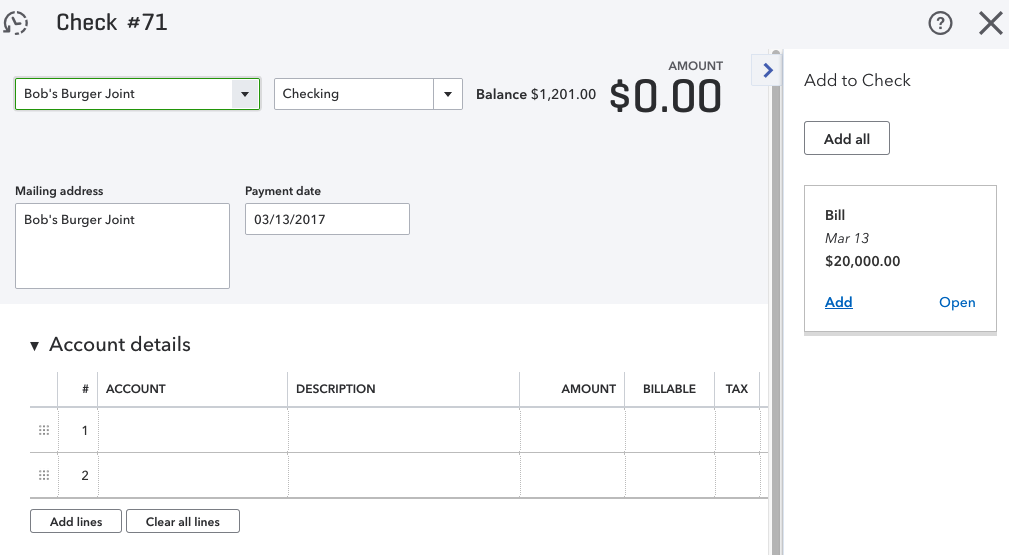
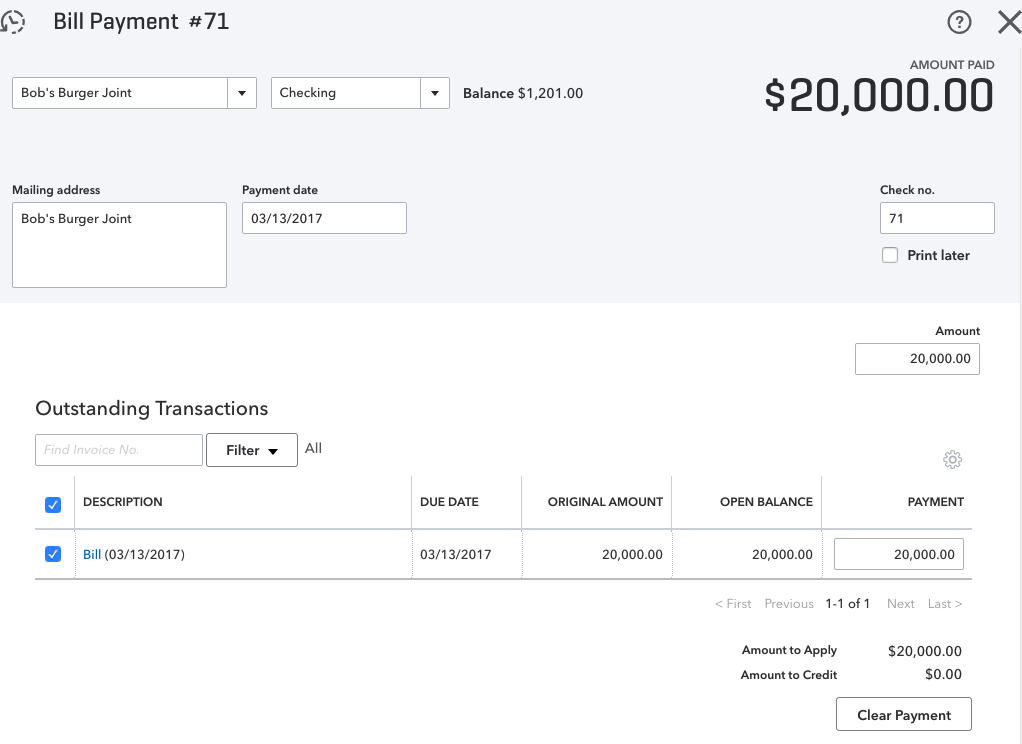
If you try to write a check to a vendor who has an open bill in QuickBooks Online, a tab will open to the right showing the open bills for that vendor, and asking if you wish to add the bill to the check (as shown in screenshot below). When you click Add, the payment will automatically link to the bill which will zero it out from the vendor balance as well as the accounts payable.
 Click for Larger Image
 Click for Larger Image
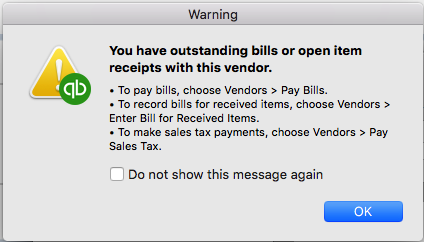
If you attempt to write a check for a vendor who has an open bill in QuickBooks Desktop versions – Pro, Premier, or Enterprise, you will get a warning (as shown in screenshot below) or similar. If you continue to write the check for a bill instead of using the pay bills feature, not only will that bill remain open and unpaid in QuickBooks, but you will have doubled your expenses for that particular expense or cost of goods sold account.
NOTE: It’s never a good idea to change transactions for past periods, so if you have already filed your taxes based on the information you have in QuickBooks, you will need to speak with your CPA or tax preparer prior to making any changes to those periods that have already been reported.
To correct Vendor Balances in the Desktop versions – QuickBooks Pro, Premier or Enterprise, due to the Write Check feature Being Used Instead of the Pay Bills feature, follow these steps:
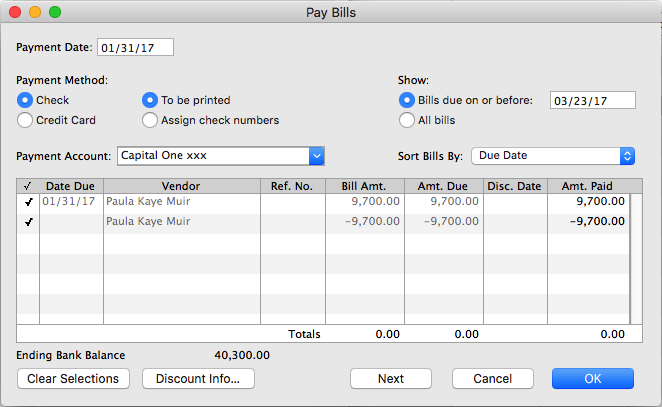
- Open the checks that were paid for each bill, and change the account from the expense used to Accounts Payable (as shown in screenshot below).

- Next, go to Vendors, then Pay Bills and click to the left of each transaction to checkmark them (as shown in screenshot below) (One is the bill and the other is the check).
- Change the date to reflect date of check used to pay this bill.
- Click OK, Save or Save and Close.
Now when you look at your vendor balance, those amounts should not be included. Also, if you look at your Accounts Payable on your balance sheet, those amounts should not be there. If there are a lot to be done, you may edit all the checks and change their accounts to “Accounts Payable” first, then go to “Pay Bills” and select them all. Just be sure the “Totals” amount in the “Pay Bills” window is zero before hitting that Ok, Save, or Save and Close button.
NOTE: If a portion of the individual bills were paid with the “Write check” feature and the other portion with the “Pay bills” feature, the above-mentioned solution will work as well. Just ensure that the checks you are editing and changing from their respective expense account to Accounts Payable, are the ones that do apply to the respective vendor/vendor bill. Also, whatever you do, do not delete any checks or payments for any period that was already reconciled. It will definitely throw off your reconciliations!
Remember: A bill will remain in open/unpaid status after writing a check if you used the QuickBooks “Write Checks” feature rather than the “Pay Bills” feature to pay it. This is so because the two Accounts Payable features – Enter Bills and Pay Bills, work together. If you use Write Checks with Enter Bills, the check will not be linked to the bill, and the bill will remain in open/unpaid status.
Here are Two (2) General Guidelines to Follow When Deciding How to Make Payments:
- If you pay bills as they arrive and do not need to see reports on how much you owe vendors, use Write Checks.
- If you prefer to pay bills all at once for example on the same day each month, and you want to see reports on how much you owe vendors, or if you usually make partial bill payments, then use Enter Bills and Pay Bills which are both linked to Accounts Payable.
Use the above-mentioned method to correct your vendor balances, and remember to always use the “Pay Bills” feature if you used the “Enter Bills” feature, and not the “Write Check” feature – moving forward.
by Marie | Oct 22, 2016 | Bookkeeping 101, Business Types & Accounting, QuickBooks for Mac, QuickBooks for Windows, QuickBooks Online
Like pretty much anything else, if you don’t establish the foundation, you will not have anything to build on. If you do not know the basics of accounting, then whatever you attempt to do that relates to accounting, will be futile. Getting the numbers right, can either make or break your business, and if you are like me you want to make your business – not break it.
The first thing we need to do is define accounting and bookkeeping:
Accounting is an entire system of recording information based on specific principles, analyzing those information, and advising on the action to take based on those information. It is often broken down into two parts: the actual entering of the transactions (bookkeeping) and the analysis, interpreting, and communicating of those data (accounting). Thus, accounting is the process of making sense of information previously compiled, and producing financial models using that information. In other words, bookkeeping compiles, while accounting analyze, interprets, and communicate the information to its owner(s). Accounting entails: preparing adjusting entries – recording expenses that have occurred but are not yet recorded in the bookkeeping process, preparing financial statements, analyzing costs of living or business operations, completing income tax returns, assisting the individual or business owner in understanding the impact of financial decisions. Accounting is either accrual or cash basis; however, GAAP only accepts accrual method of accounting.
Bookkeeping is the process of recording daily transactions in a consistent, systematic way so as to output the results in reportable formats from which good business decisions can be made. It consists of: recording financial transactions – posting debits and credits, producing invoices, making purchases and paying bills, maintaining and balancing subsidiaries – general ledgers, and historical accounts, and generating payroll.
Accounting operates on a double entry basis; meaning for every debit, there is a corresponding credit and vice versa, and the entire accounting system is based on a single accounting equation: ASSETS = EQUITY + LIABILITIES. Assets, being what you own, Liabilities, being what you owe, and Equity being the difference between the two, which is what you have left.
The next thing we need to do is to lay out the principles:
Accounting principles are general rules and concepts that govern the field of accounting. These general rules, referred to as basic accounting principles and guidelines, form the groundwork on which more detailed, complicated, and legalistic accounting rules are based. For example, the Financial Accounting Standards Board (FASB) uses the basic accounting principles and guidelines GAAP as a basis for their own detailed and comprehensive set of accounting rules and standards. Generally Accepted Accounting Principles (GAAP) consists of three important sets of rules: (1) the basic accounting principles and guidelines, (2) the detailed rules and standards issued by FASB and its predecessor the Accounting Principles Board (APB), and (3) the generally accepted industry practices.
GAAP is exceedingly useful because it attempts to standardize and regulate accounting definitions, assumptions, and methods. Because of generally accepted accounting principles we are able to assume that there is consistency from year to year in the methods used to prepare a company’s financial statements. And although variations may exist, we can make reasonably confident conclusions when comparing one company to another, or comparing one company’s financial statistics to the statistics for its industry.
Again, accounting is based on principles, and since the bookkeeper usually records the information, he or she will need to know what constitutes the principles in order to accurately complete the bookkeeping task. Accountants and CPA’s rely heavily on bookkeepers for accurate information, and often work closely with bookkeepers to ensure that they do get correct information. If the bookkeeping is incorrect, then more often than not, the accounting is also incorrect and the business will suffer as a result. In addition, the Chart of Accounts, which is the backbone of the accounting system, needs to be structured correctly with each account linking to its accurate account type – expense, income, asset, liability, or equity. So what are the principles?
- Revenue Principle
The revenue principle, also known as the realization principle, states that revenue is earned when the sale is made, which is typically when goods or services are provided. A key component of the revenue principle, when it comes to the sale of goods, is that revenue is earned when legal ownership of the goods passes from seller to buyer. Note that revenue isn’t earned when you collect cash for something.
Cash Basis accounting is not accepted by GAAP standard. However, since GAAP is a standard and not the law, small businesses that earn revenue within a specified threshold, are not publicly traded, and do not carry Inventory may opt to use the cash basis method of accounting.
- Expense Principle
The expense principle states that an expense occurs when the business uses goods or receives services. In other words, the expense principle is the flip side of the revenue principle. As is the case with the revenue principle, if you receive some goods, simply receiving the goods means that you have incurred the expense of the goods. Similarly, if you have received a service, you have incurred the corresponding expense. It doesn’t matter that it takes a few days or a few weeks to get the bill. You incur an expense when goods or services are received.
- Matching Principle
The matching principle is related to the revenue and the expense principles. The matching principle states that when you recognize revenue, you should match related expenses with the revenue. The best example of the matching principle concerns the case of businesses that resell inventory. For example, if you own a natural juice stand, you should count the expense of each juice sold on the day you sell those juices. Don’t count the expense when you purchase the juices or the ingredients; count the expense when you sell them. In other words, match the expense of the item with the revenue of the item.
Accrual-based accounting, which is a term you have probably heard, is what you get when you apply the revenue principle, the expense principle, and the matching principle. In a nutshell, accrual-based accounting means that you record revenue when a sale is made and record expenses when goods are used or services are received.
- Cost Principle
The cost principle states that amounts in your accounting system should be quantified, or measured, by using historical cost. For example, if you have a business and the business owns a building, that building, according to the cost principle, shows up on your balance sheet at its historical cost. You do not adjust the values in an accounting system for changes in a fair market value.
- Objectivity Principle
The objectivity principle states that accounting measurements and accounting reports should use objective, factual, and verifiable data. In other words, accountants, accounting systems, and accounting reports should rely on subjectivity as little as possible. An accountant always wants to use objective data – even if it’s bad, rather than subjective data – even if the subjective data is arguably better.
- Full Disclosure Principle
Full disclosure states that if certain information is important to an investor or lender using the financial statements, that information should be disclosed within the statement or in the notes to the statement. It is because of this basic accounting principle that numerous pages of “footnotes” are often attached to financial statements. As an example, let’s say a company is named in a lawsuit that demands a significant amount of money. When the financial statements are prepared it is not clear whether the company will be able to defend itself or whether it might lose the lawsuit. As a result of these conditions, and because of the full disclosure principle, the lawsuit will be described in the notes to the financial statements. A company usually lists its significant accounting policies as the first note to its financial statements.
- Continuity Assumption
The continuity assumption or going concern principle assumes that a company will continue to exist long enough to carry out its objectives and commitments and will not liquidate in the foreseeable future. The importance of the continuity assumption becomes most clear if you consider the ramifications of assuming that a business won’t continue. If a business will not continue, it becomes very unclear how one should value assets if the assets have no resale value. If a business will not continue operations, no assurance exists that any of the inventory can be sold. If the inventory cannot be sold, what does that say about the owner’s equity value shown in the balance sheet? If the company’s financial situation is such that the accountant believes the company will not be able to continue on, the accountant is required to disclose this assessment.
- Unit-of-measure Assumption
The unit-of-measure assumption assumes that a business’s domestic currency is the appropriate unit of measure for the business to use in its accounting. In other words, the unit-of-measure assumption states that it’s okay for U.S. businesses to use U.S. dollars in their accounting. The unit-of-measure assumption also states, implicitly, that even though inflation and, occasionally, deflation change the purchasing power of the unit of measure used in the accounting system, that’s still okay.
- Separate Entity Assumption
The separate entity assumption states that a business entity, like a sole proprietorship, is a separate entity, a separate thing from its business owner. And the separate entity assumption says that a partnership is a separate thing from the partners who own part of the business. The separate entity assumption, therefore, enables one to prepare financial statements just for the sole proprietorship or just for the partnership. As a result, the separate entity assumption also relies on a business being separate and distinct and definable as compared to its business owners. For legal purposes, a sole proprietorship and its owner are considered to be one entity, but for accounting purposes they are considered to be two separate entities.
- Time Period Assumption
The time period assumption principle assumes that it is possible to report the complex and ongoing activities of a business in relatively short, distinct time intervals such as the three months ended March 31, 2016, or the 13 weeks ended April 1, 2016. The shorter the time interval, the more likely the need for the accountant to estimate amounts relevant to that period. For example, the property tax bill is received on December 16 of each year. On the income statement for the year ended December 31, 2015, the amount is known; but for the income statement for the three months ended March 31, 2016, the amount was not known and an estimate had to be used. It is also very important that the time interval (or period of time) be shown in the heading of each income statement, statement of stockholders’ equity, statement of cash flow, and all other reports. Labeling one of these financial statements with “December 31” is not good enough. The reader needs to know if the statement covers the one week ended December 31, 2015 the month ended December 31, 2015, the three months ended December 31, 2015, or the year ended December 31, 2015.
Of course you do not need to know all of this in order to accurately use an accounting software, but knowing the basics and having an understanding of the elements of accounting, will allow you to enter information correctly and subsequently have accurate numbers from which to run your business as well as file its taxes. Also, the way you set up your Chart of Accounts and enter data will need to be modified to reflect the type of business entity, but the basics – debits, credits, purchases, sales, income, expenses, assets, liabilities – remain the same.
by Marie | Oct 10, 2016 | QuickBooks for Mac, QuickBooks for Windows, QuickBooks Online, Troubleshooting

You probably had some checks that were marked “To Print” in the desktop edition, but were never printed. No worries though, this can be taken care of pretty simply by one of two methods.
- There is a handy tool in the new QuickBooks Online that lets you remove the checks from the list. Simply select all the checks you want to have removed from the list, and check the box at Remove from list
- The next method is to print to PDF which will get the checks out of the print list without wasting your ink or paper. After selecting “Print” choose Save as PDF at the bottom left of the Print screen. Name the file and choose a location to save it to. Click Save. (This method is the only one that can be used to clear checks in the desktop editions of QuickBooks.)
Either method can be used, and will not interfere with your data in any way, as printing checks has absolutely nothing to do with your direct financials.
How to Print Multiple Checks/Batch Print in QuickBooks
After you have recorded the bill payments in QuickBooks Online, they can be batched printed from the print checks page.
- Click the Plus sign at the top center of a main page
- Select Print Checks under Vendors
- Check the boxes to the left of the checks you wish to print and click Preview and Print on the bottom
- Click Print on the preview page to send the checks to the printer
by Marie | Oct 4, 2016 | Classes & Location, Company Setup & Management, Financial Statements & Reports, Preferences & Customization, QuickBooks for Mac, QuickBooks for Windows, QuickBooks Online
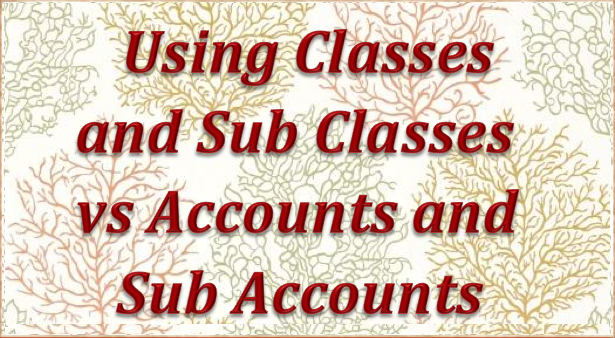
The main difference between class and account, is that every transaction must have an account assigned to it, while it’s optional to assign a class. So think of the class list as having a second chart of accounts which you can apply to transactions to group them into categories different from those provided by the Chart of Accounts.
Accounts mostly organize transactions into financial categories – income, expenses, receivables, payables etc., but classes let you organize transactions into any categories you want, and you have full control over what those categories are. The Class list is empty when you first create a QuickBooks company file, so you can set up any number of classes you want in it. Most often you’ll use classes for grouping transactions into management information categories as opposed to the financial accounting categories provided by the Chart of Accounts.
As a general rule, use accounts to identify the “what” of a transaction and classes to identify the “why” or “what for”. For example, if you buy Office Supplies for multiple departments and you want to keep track of each department’s use, the “what” is office supplies; the “what for” is the various departments – administrative, sales, production, etc. So office supplies (expense) should be an account and each department should be set up as a class.
Creating lots of sub-accounts is a common mistake among new QuickBooks users; however, it should be avoided at all cost. To illustrate the problem, consider this fragment from a simple chart of accounts:
Office Supplies
Marketing
Accounting
Now here is the same fragment of the chart of accounts, but with sub-accounts added:
Office Supplies
Administrative Department
Sales Department
Production Department
Marketing
Website
Events
Accounting
Bookkeeping
Audit Prep
As you can see in the illustration, the account list can become exponentially long which will produce very lengthy, unattractive financial reports. The Classes list in QuickBooks can have up to five levels (classes and subclasses), which gives you more functionality and flexibility in using the class feature. To have class information arranged in reports in a way that provides the most benefit, it does help to give some thought as to how the list should be structured.
To Turn on Class Tracking in QuickBooks Windows – Pro, Premier, Enterprise:
- Click on Edit, then Preferences in the main menu to open the Preferences window.
- Click on the Accounting icon in the left pane of the Preferences window.
- Select the Company Preferences tab in the right pane.
- Checkmark the Use class tracking item on the Company Preferences tab.
- Click OK to close the Preferences window.
To Turn on Class Tracking in QuickBooks Mac:
- Click on QuickBooks, then Preferences in the main menu to open the Preferences window.
- Click on the Transactions under Workflow and check the box that says Use class tracking.
- Click OK.
To Turn on Class Tracking in QuickBooks Online:
There are four (4) levels of Quickbooks Online subscription: 1) Simple Start, 2) Essential, 3) Online Plus, 4) Advanced. Class tracking is only available in the Online Plus and Advanced editions.
- Click on the Gear icon at top right of screen (your company name) and select Account and Settings under the Your Company tab
- Click the Advanced button in the left menu bar, then click the pencil icon at Categories to edit preference.
- Check the box at Track classes (You may also want to check the box at Warn me when a transaction isn’t assigned a class)
- Click Save.
After completing these steps, a Class column will appear in many of QuickBooks’ form windows. In some cases such as for invoices, you may have to customize the form’s template to have the Class column appear.
by Marie | Oct 2, 2016 | Banking Setup & Management, Chart of Accounts Setup & Management, QuickBooks for Mac, QuickBooks for Windows, QuickBooks Online

First, I want to say that you need to be absolutely sure that both accounts are for the same bank account before making the merge. Once merged, it cannot be un-merged! Also, if you are using a desktop edition of QuickBooks, do make a backup before proceeding with this merger. It is good practice to make a backup copy before doing anything major in your QuickBooks company file.
How to Merge Two Bank Accounts in QuickBooks
First you’ll want to go to the Chart ofAccounts and select the bank account that you want to be gone. Next, edit this account and make the spelling of the name be the exact as the one you are keeping. (A pop up box will open with a message “This name is already being used. Would you like to merge them?”) Answer Yes then Merge Accounts if asked, and your bank accounts will be merged.
- Go to List and select Chart of Accounts
- Select the bank account you do not want to keep, and click Edit at bottom left.
- Type the name of the Account you are keeping, the exact way it is on the one you are keeping, and click Ok.
- You will now be asked to confirm if you really want to go ahead with the merge. Answer Yes then Merge Accounts if asked, and your accounts will be merged.
Note: This is the same method used to merge other chart of accounts, vendors, or customers.
by Marie | Oct 2, 2016 | Company Setup & Management, Financial Statements & Reports, QuickBooks for Mac, QuickBooks for Windows

I do not recommend deleting memorized reports in QuickBooks as it has been known to cause the file to be corrupted.
One alternative is to create a folder called something like “Inactive” or “Old” and move the unwanted memorized reports there instead. Of course, this does not always happen as I have had a lot of clients do this without a problem, but it has happened multiple times in the past and you don’t know when it will happen and you certainly do not want your files getting corrupted.
How to Delete a Memorized Report in QuickBooks Windows – Pro, Premier, Enterprise
- Go to Report, then select Memorized Report List
- Select the report you want to delete in order to highlight it, then click the Memorized Report dropdown at bottom left and select Delete Memorized Report.
- Click Ok.
How to Delete a Memorized Report in QuickBooks Mac
- Go to Report, then select Report Center and click Memorized Reports
- Select the report you want to delete in order to highlight it, then click the X to the left of it.
- Click Ok.
by Marie | Aug 25, 2016 | Bookkeeping 101, Chart of Accounts Setup & Management, QuickBooks for Mac, QuickBooks for Windows, QuickBooks Online
Cost of Goods Sold are those costs that are directly associated with the production of a good or goods, or with direct service that leads to a sale. Expenses are all the other costs that are not COGS. See list of COGS and Expenses below:
Cost of Goods Sold Accounts
- Blueprints and Reproduction: Blueprints, photostats, and other printing expense
- Bond Expense: Construction bonds expenses directly related to jobs
- Construction Materials Costs: Construction materials costs
- Contracted Services: Direct labor costs for contract (non-employees) performing services for clients
- Equipment Rental for Jobs: Rent paid for rented equipment used on jobs
- Freight and Shipping Costs: Freight-in and shipping costs for delivery to customers
- Freight Costs: Costs of freight and delivery for merchandise purchased
- Job Materials Purchased: Construction materials used on jobs
- Linens and Lodging Supplies: Costs of linens and other supplies for guest rooms
- Materials Costs: Cost of materials used on jobs
- Media Purchased for Clients: Print, TV, radio, and other media purchased for clients
- Merchant Account Fees: Credit card merchant account discount fees, transaction fees, and related costs
- Other Construction Costs: Other costs directly related to jobs such as waste disposal, onsite storage rental, etc.
- Other Job Related Costs: Other costs directly related to jobs such as waste disposal, onsite storage rental, etc.
- Parts Purchases: Purchases of parts for use on customer repairs or resale
- Purchases – Hardware for Resale: Purchases of hardware items for resale that are not tracked or counted in inventory
- Purchases – Resale Items: Purchases of items for resale that are not tracked or counted in inventory
- Purchases – Software for Resale: Purchases of software items for resale that are not tracked or counted in inventory
- Subcontracted Services: Subcontracted services for customer service orders
- Subcontractors Expense: Subcontracted services performed by other contractors
- Tools and Small Equipment: Purchases of tools or small equipment used on jobs
- Worker’s Compensation Insurance: Worker’s compensation insurance premiums
Expense Accounts
- Advertising and Promotion: Advertising, marketing, graphic design, and other promotional expenses
- Auto and Truck Expenses: Fuel, oil, repairs, and other maintenance for business autos and trucks
- Automobile Expense: Fuel, oil, repairs, and other automobile maintenance for business autos
- Bank Service Charges: Bank account service fees, bad check charges and other bank fees
- Business Licenses and Permits: Business licenses, permits, and other business-related fees
- Car and Truck Expenses: Fuel, oil, repairs, and other car and truck maintenance
- Chemicals Purchased: Costs of chemicals used in farming operations
- Computer and Internet Expenses: Computer supplies, off-the-shelf software, online fees, and other computer or internet related expenses
- Continuing Education: Seminars, educational expenses and employee development, not including travel
- Depreciation Expense: Depreciation on equipment, buildings and improvementsDues and Subscriptions: Subscriptions and membership dues for civic, service, professional, trade organizations
- Equipment Rental: Rent paid for rented equipment used for business
- Fertilizers and Lime: Fertilizers and lime purchased for farm operations
- Freight and Trucking: Amounts paid for freight or trucking of farm products
- Gasoline, Fuel and Oil: Gasoline, fuel or oil used for farm machinery
- Insurance Expense: Insurance expenses
- Insurance Expense: General Liability Insurance: General liability insurance premiums
- Insurance Expense: Life and Disability Insurance: Employee life and disability insurance premiums
- Insurance Expense: Professional Liability: Professional liability (errors and omissions) insurance
- Insurance Expense: Workers Compensation: Worker’s compensation insurance premiums
- Interest Expense: Interest payments on business loans, credit card balances, or other business debt
- Janitorial Expense: Janitorial expenses and cleaning supplies
- Landscaping and Groundskeeping: Landscape maintenance, gardening, and pool maintenance costs
- Marketing Expense: Advertising, marketing, graphic design, and other promotional expenses for our company
- Meals and Entertainment: Business meals and entertainment expenses, including travel-related meals (may have limited deductibility)
- Office Supplies: Office supplies expense
- Payroll Expenses: Payroll expenses
- Postage and Delivery: Postage, courier, and pickup and delivery services
- Printing and Reproduction: Printing, copies, and other reproduction expenses
- Professional Fees: Payments to attorneys and other professionals for services rendered
- Rent Expense: Rent paid for company offices or other structures used in the business
- Repairs and Maintenance: Incidental repairs and maintenance of business assets that do not add to the value or prolong its life
- Research Services: Research costs including legal library and subscriptions for research services
- Salon Supplies, Linens, Laundry: Costs of supplies used in the course of business (includes linens and laundry services)
- Seeds and Plants Purchased: Seeds and plants purchased for producing farm income
- Shop Expense: Miscellaneous shop supplies and related shop expenses (rags, hand cleaning supplies, etc.)
- Small Tools and Equipment: Purchases of small tools or equipment not classified as fixed assets
- Storage and Warehousing: Amounts paid to store farm commodities
- Taxes – Property: Taxes paid on property owned by the business, franchise taxes, excise taxes, etc.
- Telephone Expense: Telephone and long distance charges, faxing, and other fees Not equipment purchases
- Travel Expense: Business-related travel expenses including airline tickets, taxi fares, hotel and other travel expenses
Uniforms: Uniforms for employees and contractors
- Utilities: Water, electricity, garbage, and other basic utilities expenses
by Marie | Aug 24, 2016 | Bookkeeping 101, Chart of Accounts Setup & Management, Deposits & Undeposited Funds, QuickBooks for Mac, QuickBooks for Windows, QuickBooks Online

Tenant security deposits are not income and as such, they are to be held until tenant is giving up lease or given notice to leave. If at this point there are repairs to be done, the cost of the total repairs will be deducted and the remainder of the deposit returned to the tenant.
Here is how you enter tenant security deposits correctly in QuickBooks:
- Create an account in your chart of accounts called Tenant Security Deposit, with its type “Other Current Liability”. To do this: a) Select List from the top menu bar, then Chart of Accounts. b) At bottom left, click on the plus sign (in the mac version) or Account then New (in the Windows version – Pro, Premier, Enterprise). Next:
- Go to Banking, Make Deposits and enter the correct date, the tenant’s name in the “Received From” column, select the liability account you just created in the “From Account” column, and enter the payment type, reference number, memo, and amount of the deposit. Be sure to select the bank account you will deposit the tenant’s security deposit to, at the “Deposit to:” drop down option at top left.
- Click Save, Save and New or Save and Close.
In QuickBooks Online, a) Go to Transactions in the left menu bar, then select Chart of Accounts then New at top right of screen. Next:
- Go to the Plus sign at top center of screen, then select Bank Deposit under “Other”
- Enter the correct date, the tenant’s name in the “Received From” column, select the liability account you just created in the “Account” column, and enter the payment type, reference number, description, and amount of the deposit. Be sure to select the bank account you will deposit the tenant’s security deposit to, at the top left drop down option.
- Click Save and New or Save and Close at bottom right.
Any question(s), please feel free to browse our Frequently Asked Questions categories or drop Marie a note.
Recent Comments