by Marie | Mar 13, 2017 | Billing & Payables, Bookkeeping 101, QuickBooks for Mac, QuickBooks for Windows, QuickBooks Online, Troubleshooting, Vendor Setup & Management
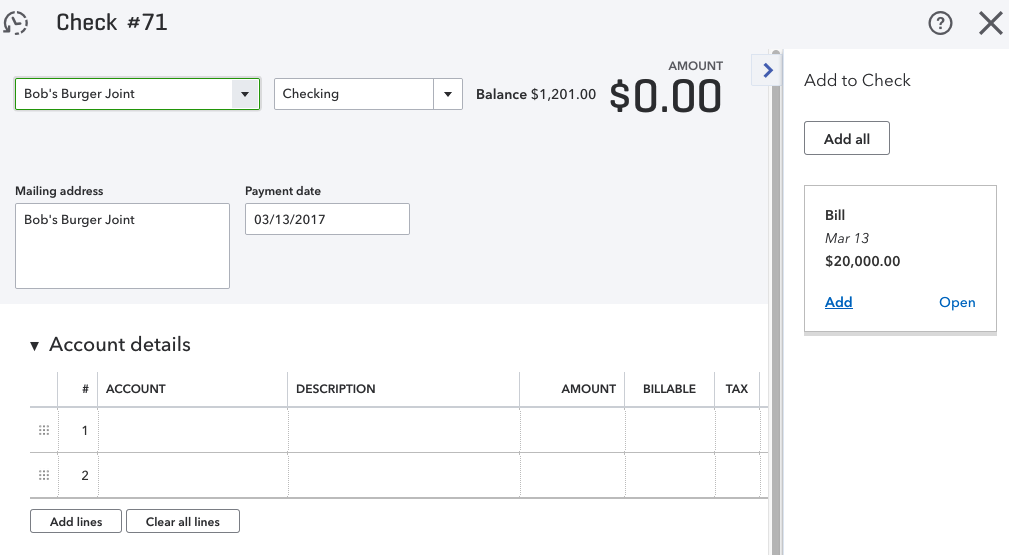
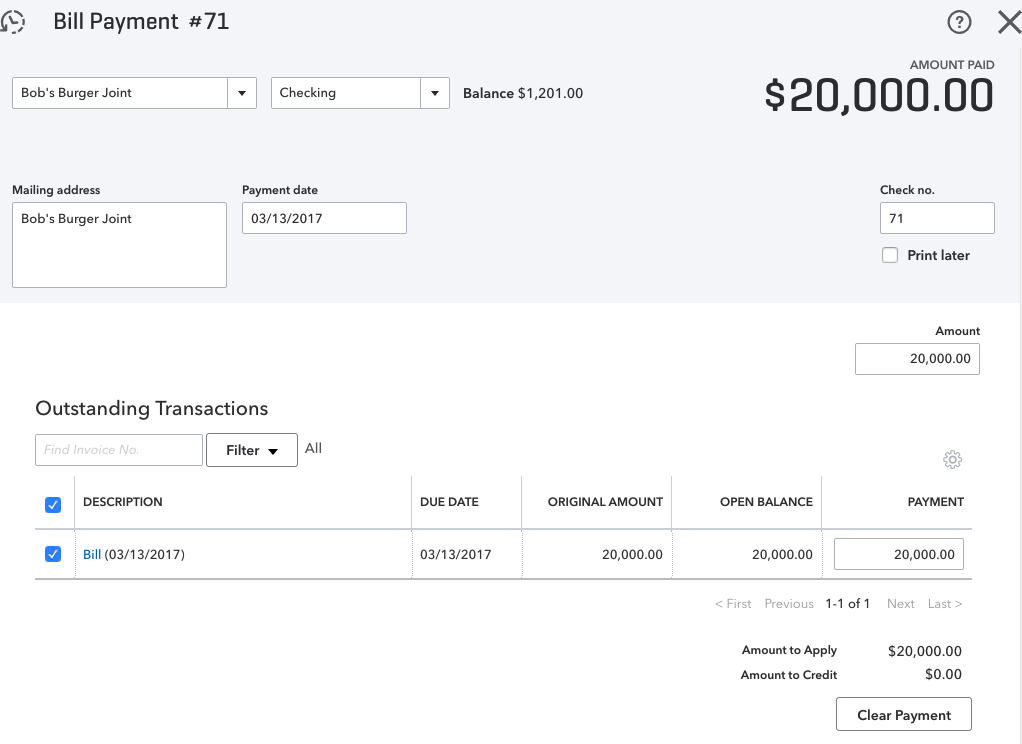
If you try to write a check to a vendor who has an open bill in QuickBooks Online, a tab will open to the right showing the open bills for that vendor, and asking if you wish to add the bill to the check (as shown in screenshot below). When you click Add, the payment will automatically link to the bill which will zero it out from the vendor balance as well as the accounts payable.
 Click for Larger Image
 Click for Larger Image
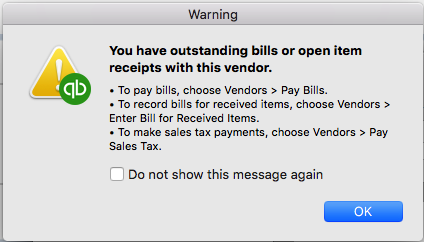
If you attempt to write a check for a vendor who has an open bill in QuickBooks Desktop versions – Pro, Premier, or Enterprise, you will get a warning (as shown in screenshot below) or similar. If you continue to write the check for a bill instead of using the pay bills feature, not only will that bill remain open and unpaid in QuickBooks, but you will have doubled your expenses for that particular expense or cost of goods sold account.
NOTE: It’s never a good idea to change transactions for past periods, so if you have already filed your taxes based on the information you have in QuickBooks, you will need to speak with your CPA or tax preparer prior to making any changes to those periods that have already been reported.
To correct Vendor Balances in the Desktop versions – QuickBooks Pro, Premier or Enterprise, due to the Write Check feature Being Used Instead of the Pay Bills feature, follow these steps:
- Open the checks that were paid for each bill, and change the account from the expense used to Accounts Payable (as shown in screenshot below).

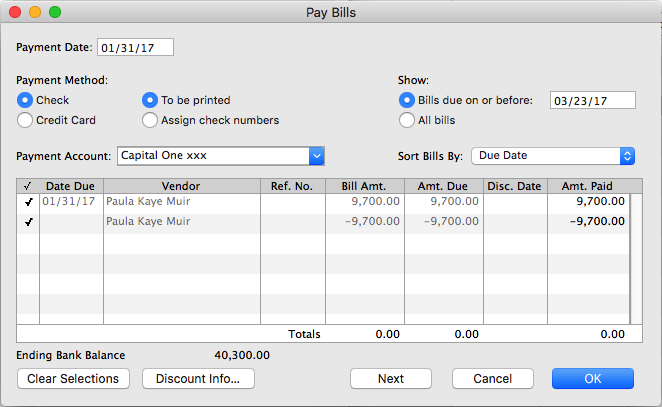
- Next, go to Vendors, then Pay Bills and click to the left of each transaction to checkmark them (as shown in screenshot below) (One is the bill and the other is the check).
- Change the date to reflect date of check used to pay this bill.
- Click OK, Save or Save and Close.
Now when you look at your vendor balance, those amounts should not be included. Also, if you look at your Accounts Payable on your balance sheet, those amounts should not be there. If there are a lot to be done, you may edit all the checks and change their accounts to “Accounts Payable” first, then go to “Pay Bills” and select them all. Just be sure the “Totals” amount in the “Pay Bills” window is zero before hitting that Ok, Save, or Save and Close button.
NOTE: If a portion of the individual bills were paid with the “Write check” feature and the other portion with the “Pay bills” feature, the above-mentioned solution will work as well. Just ensure that the checks you are editing and changing from their respective expense account to Accounts Payable, are the ones that do apply to the respective vendor/vendor bill. Also, whatever you do, do not delete any checks or payments for any period that was already reconciled. It will definitely throw off your reconciliations!
Remember: A bill will remain in open/unpaid status after writing a check if you used the QuickBooks “Write Checks” feature rather than the “Pay Bills” feature to pay it. This is so because the two Accounts Payable features – Enter Bills and Pay Bills, work together. If you use Write Checks with Enter Bills, the check will not be linked to the bill, and the bill will remain in open/unpaid status.
Here are Two (2) General Guidelines to Follow When Deciding How to Make Payments:
- If you pay bills as they arrive and do not need to see reports on how much you owe vendors, use Write Checks.
- If you prefer to pay bills all at once for example on the same day each month, and you want to see reports on how much you owe vendors, or if you usually make partial bill payments, then use Enter Bills and Pay Bills which are both linked to Accounts Payable.
Use the above-mentioned method to correct your vendor balances, and remember to always use the “Pay Bills” feature if you used the “Enter Bills” feature, and not the “Write Check” feature – moving forward.
by Marie | Mar 12, 2017 | Banking Setup & Management, Bookkeeping 101, QuickBooks Online, Reconciliations, Troubleshooting
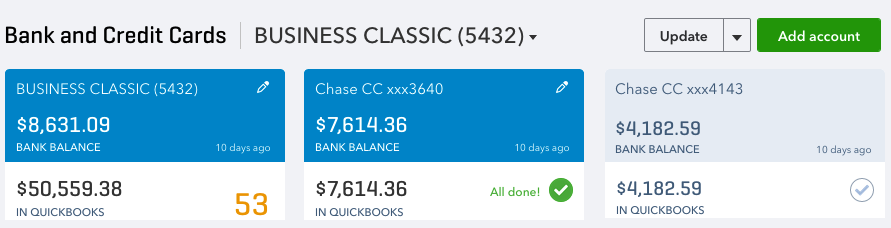
This is one of the most common questions I get asked by new QuickBooks Online users, and you may be surprised to know that more often than not, both bank and QuickBooks balances are never matched simultaneously. However, if you have updated your bank downloads, reviewed and added them all to the QuickBooks register for a specific period or timeframe, and your balances are not matching there may be cause for concern. Here are three main reasons why your actual bank balance does not equal the bank balance in QuickBooks Online.
- You or someone else may have manually added some transactions to QuickBooks and then added them again from the download screen. (This is one reason why it is important to establish and use only one method of inputting your transactions in QuickBooks which is either a) adding transactions via the QuickBooks banking download option, or b) manually adding individual transactions. Adding transactions via the download option is my personal preference and recommendation, as it saves time as well as minimize data entry errors. Subsequently, if you are reconciling your account and realize there are transactions missing that were not downloaded, you can manually enter those missing transactions that are on your bank or credit card statement but not in QuickBooks. It’s very rare for this to happen, but it does!)
- You have manually written check(s) directly in QuickBooks and those checks have not yet been presented to your bank to be cashed. (This will cause your QuickBooks balance to be less than your actual bank balance by the check or checks amount.)
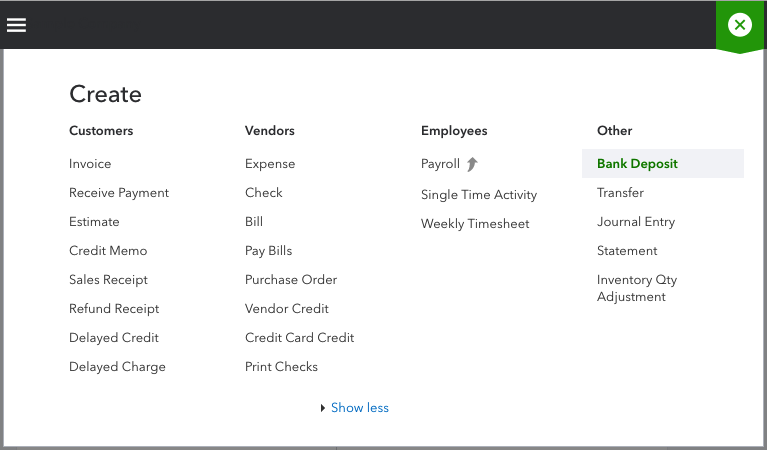
- You have received and applied customer payment(s) to their Invoices in QuickBooks, and also deposited them to the bank account in QuickBooks; however, you have not yet deposited those payments to your actual bank account or you have but they are not yet recorded by your bank. (This will cause your QuickBooks balance to be more than than your actual bank balance by the total of the deposit(s). (When you receive customer payments, you want to apply them to their respective Invoices for the dates that you receive them; however, you may not always deposit them to your actual bank account on the date that you receive them. This is where the undeposited funds account comes in; use the undeposited funds account to house those customer payments until you actually deposit them to your real bank account. When you have made the deposits to your actual bank account, use the Bank Deposit option at the plus sign top right of screen (as shown in the screenshot below) to transfer those payments in the undeposited funds account to the bank account in QuickBooks.)
How to Ensure Your Actual Bank Account Balance and QuickBooks Bank Balance are in Synch
In addition to the above-mentioned, if you track your cash flow on a daily basis, you will always be able to see what is causing your QuickBooks bank balance and your actual bank balance to be out of synch. Also, it is imperative that you reconcile your bank and credit card accounts regularly – at least on a monthly basis. Reconciliation is one of the most important aspect of accounting, and as such, reconciling your bank and credit card accounts on a monthly basis is the foundation of keeping healthy data and maintaining accurate books. Here are some mistakes that reconciliation can help you uncover:
- Missing transactions
- Duplicate transactions
- Transactions entered in error
- Transactions entered to the wrong period or bank/credit card account
- Incorrect transaction amount entered in QuickBooks
- Incorrect or no opening bank balance entered in QuickBooks
- Transactions previously reconciled have been changed or deleted
So, there you have it! The three (3) main reasons why your QuickBooks bank balance and your actual bank balance are not matching, and what you can do about it. Feel free to leave your questions or comments below.
by Marie | Oct 10, 2016 | QuickBooks for Mac, QuickBooks for Windows, QuickBooks Online, Troubleshooting
You probably had some checks that were marked “To Print” in the desktop edition, but were never printed. No worries though, this can be taken care of pretty simply by one of two methods.
- There is a handy tool in the new QuickBooks Online that lets you remove the checks from the list. Simply select all the checks you want to have removed from the list, and check the box at Remove from list
- The next method is to print to PDF which will get the checks out of the print list without wasting your ink or paper. After selecting “Print” choose Save as PDF at the bottom left of the Print screen. Name the file and choose a location to save it to. Click Save. (This method is the only one that can be used to clear checks in the desktop editions of QuickBooks.)
Either method can be used, and will not interfere with your data in any way, as printing checks has absolutely nothing to do with your direct financials.
How to Print Multiple Checks/Batch Print in QuickBooks
After you have recorded the bill payments in QuickBooks Online, they can be batched printed from the print checks page.
- Click the Plus sign at the top center of a main page
- Select Print Checks under Vendors
- Check the boxes to the left of the checks you wish to print and click Preview and Print on the bottom
- Click Print on the preview page to send the checks to the printer
Recent Comments