by Marie | Mar 20, 2016 | Bookkeeping 101, Importing Files & Forms To QuickBooks, QuickBooks for Mac, QuickBooks for Windows, QuickBooks Online, Third Party Applications - QuickBooks Compatible
There are two ways to download Paypal transactions to QuickBooks: 1) via .iif file and 2) via .csv or Excel. I do not recommend the IIF approach as it does not allow for editing before uploading to QuickBooks, and Paypal transactions are not as seamless as bank transactions – they require editing. Instead, export the reports to Excel where you will be able to do the necessary editing before uploading to QuickBooks.
How to Import Paypal Transactions into QuickBooks
- Log in to your PayPal account
- Click the Activity tab, and select your date range
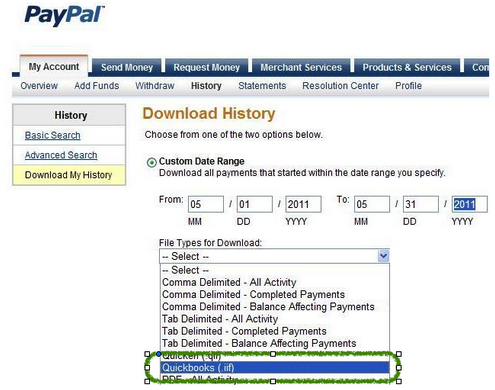
- Click the small Download link to the top right corner of the screen to get to the Download History screen
- Choose your date range, either Custom Date Range or Last Download to Present from the drop-down list
- Choose File Type to Download, file would be QuickBooks (.iif)
- Click Download History
- When prompted to enter the account names, enter the account names exactly as they appear in the Company’s Chart of Accounts:
- Name of PayPal Account
- Name of Other Expenses Account
(Be sure that the expense account being used is not a sub-account of another expense account or it will be turned into a bank account when it is imported into QuickBooks).
(If Accounts Payable balances are being paid by PayPal transactions, you can enter the name of your Accounts Payable account here, but the Vendor names in PayPal must match the names in QuickBooks).
- Name of Other Income Account
(Also, be sure that the income account being used is not a sub-account of another income account or it will be turned into a bank account when it is imported into QuickBooks).
(If Accounts Receivable balances are being paid by PayPal transactions, you can enter the name of your Accounts Receivable account here, but the Customer names in PayPal must match the names in QuickBooks).
Note: You will have to fill in all of the boxes, or you will receive a message from PayPal stating: You must complete the above fields to download your log.
- Save the iif to the desktop
- From the QuickBooks File menu, select Utilities, Import then IIF Files
- Select the iif file located on the Desktop, and click Open
by Marie | Mar 19, 2016 | Banking Setup & Management, Importing Files & Forms To QuickBooks, QuickBooks for Mac, QuickBooks for Windows, QuickBooks Online, Reconciliations
Obviously, if you are merging two bank or credit card accounts, it means they are for the same credit card or bank account. You have either lost or misplaced your credit card and have received a new one, or have had your current bank account changed due to fraud, etc. and now having trouble with the banking downloads in QuickBooks.
Not sure why merging two bank or credit card accounts unreconciles previous reconciliations in QuickBooks, but it does. So, if there are a lot of transactions in the old credit card account, do not use this method. Instead, create a new bank or Credit Card account, move the balance over and make a note in the old account to indicate that it is the old one. When you link this new bank or CC account in QuickBooks with the bank or credit card company, all the new transactions will come in so you can reconcile from there. This is the best option as it does not change previous reconciliations in any way.
How to Merge Credit Card Accounts That are Setup for Online Banking
Before you embark on this merger, be sure that there are no pending transactions to send and no unmatched transactions in the old account. Also, do not deactivate the old account from online banking services. Deactivating online services can cause errors to occur during the merge process.
1) Create a new account:
a) From the Company menu, click Chart of Accounts
b) In the Chart of Accounts, click the Account drop-down and select New
c) In the Add New Account window, choose Bank and click Continue
d) Enter a name for the account. (Be sure to give the account a new name. You can change the name back when you have completed the merge)
e) Click Save & Close
2) Set up Online Banking and connect the new account to the appropriate financial institution
3) Accept any transactions that downloaded and record them into the register
4) You should now have both accounts connected for Online Banking. To avoid issues, you must merge the old account into the new account
5) In the Chart of Accounts, select the old account that will be merged into the new account, click the Account button in the lower left corner of the window, then select Edit Account
6) Change the Account Name to the exact name of the new account that you are merging into
7) Click YES when prompted by the Merge warning dialog box
8) The new account should have the entire transaction history of the old account along with any newly downloaded transactions
9) If appropriate, you can now rename the new account to the most appropriate name:
a) If you performed the merge because your credit card company has changed names, then name the account whatever is most appropriate for the credit card company new name
b) If you performed the merge because you are switching from direct connect to web connect (or vice versa) or as a troubleshooting step, then it may be appropriate to change back to the original account name
10) Because previous reconciliations were undone by the merge, mark all transactions as cleared, then refer to the previous reconciliation record that you saved from the old account and uncheck those transactions that were not previously reconciled as well as any new transactions downloaded when the new account was created.
11) Re-create pending transactions and recurring or memorized transactions as appropriate.
by Marie | Mar 2, 2016 | Bookkeeping 101, Employee Setup & Management, Payroll Setup & Management, QuickBooks for Mac, QuickBooks for Windows, QuickBooks Online
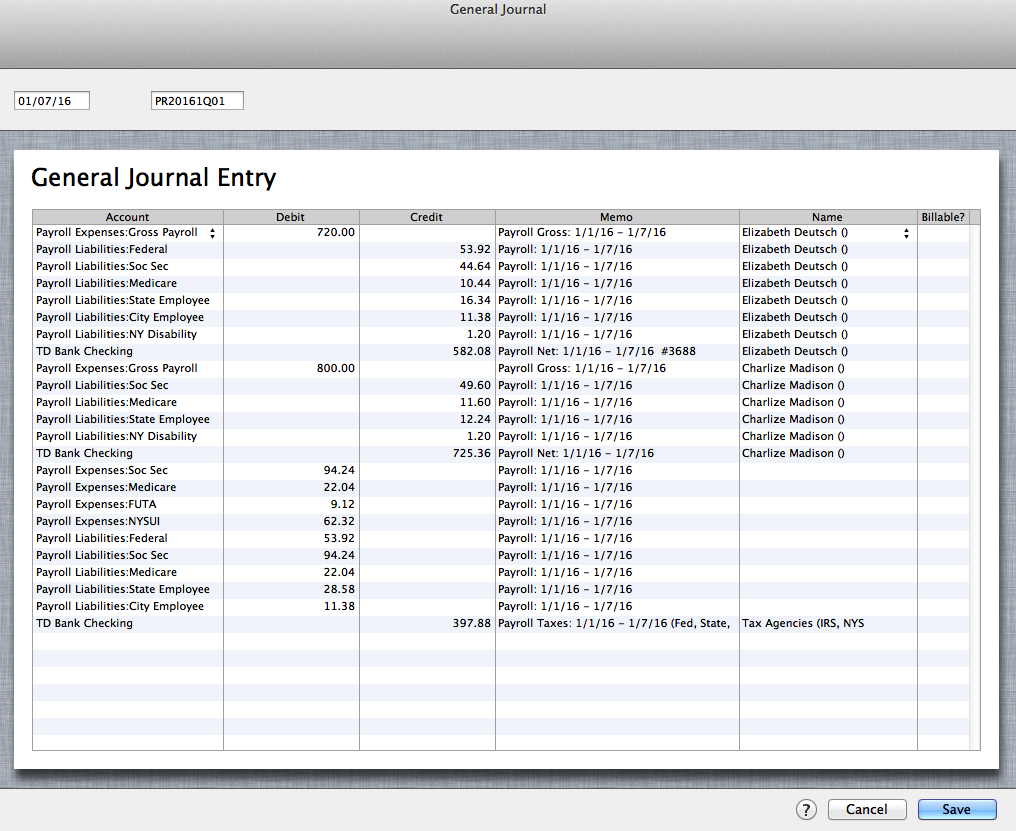
The best and most accurate way to enter third party payroll into QuickBooks is to enter them via Journal Entries. First, you want to setup the expense as well as the liability items of the payroll in the Chart of Accounts. Then you want to enter one journal entry for each pay period, using the payroll items you created in the Chart of Accounts on their correct debit and credit sides, making sure you enter the actual check dates of the paychecks. You will include the employees names in the Name field, and a memo with the pay period as well as net, gross or taxes on each transaction line.
Entering Third Party Payroll into QuickBooks:
 Create the Payroll Expense Items in the Chart of Accounts as sub of Payroll Expenses to record company expenses
Payroll Expenses
Gross Payroll
Soc Sec Company
Medicare Company
FUTA
NYSUI
 Create the Liability Items in the Chart of Accounts as sub of Payroll Liabilities to record employees withholdings
Payroll Liabilities
Federal Withholding
Soc Sec Employee
Medicare Employee
State Employee NYS
City Employee NYC
NY Disability
The Result: (click image to enlarge)
In Bank Register: (click image to enlarge)
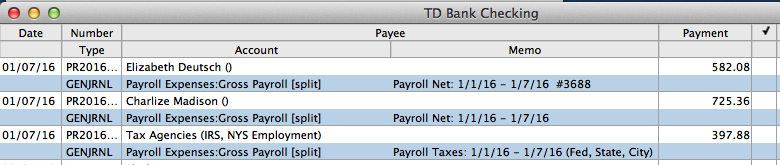
Entering third party payroll this way will allow every aspect of the payroll to be accurately accounted for; each paycheck will be listed separately with the gross, employee paid taxes, employer paid taxes, and the net payroll. The paychecks as well as the tax payments made will be easily tracked in the bank account register, and the amounts in QuickBooks will be on par with the third party company figures. Entering third party payroll this way will also make it easily identifiable in the reconcile window when you go to reconcile your bank account, and will show a balance on the balance sheet for any withholding that was not paid over to the relevant tax authority.
RELATED:
by Marie | Feb 26, 2016 | Banking Setup & Management, Bookkeeping 101, Deposits & Undeposited Funds, QuickBooks for Mac, QuickBooks for Windows, QuickBooks Online, Reconciliations
Since the accounts were reconciled for the period in which the deposits relate, it means that the same revenues were reentered directly to a bank account register without realizing that they were already entered, and are in the “undeposited funds” account waiting to be deposited to the bank from there.
The fix will depend on the number of transactions involved. If not many deposit entries, here is what you do:
 Few Deposits Fix
1) Locate the previous corresponding deposits in the bank account register and make note of their dates.
2) Make sure they are each the same amount as the deposits in the “Make Deposit” window. (You want to keep the deposits in the month they belong so as not to throw off the previous reconciliations).
3) Check to ensure that the dates in the “Make Deposit” window match the dates in the register, or at the very least, are in the same month. (The aim is to remove the entries from the “make Deposit” window without throwing off the previous reconciliations).
4) Now, go ahead and make the deposit(s) from the “Make Deposit” window for each amount(s) that were previously entered in the register, making sure you change the deposit date to reflect the previous deposit in the register as well.
5) Go back to the bank register and delete the previous deposits that were reconciled. (NOTE: Your deposits that you just made from the “Make Deposit” window should be shown either above or below the previous corresponding deposit with the same date).
6) Next, for QuickBooks Mac Pro or QuickBooks Online: checkmark each corresponding deposit that you have just deposited, as reconciled. (With the exception of the switching of the deposits, the previous reconciliations will remain the same, with accurate opening balances for each month). For QuickBooks Windows Pro/Premier: undo the previous reconciliation(s) to the first month affected by the deposits you deleted, and re-reconcile from there onward. All the deposits you entered will be there in the reconcile window for you to check off, and you will be in balance in minutes if you deposited them all accurately. (You can use the “Mark All” feature in the reconcile window by checking the box “Hide transactions after statement end date” and clicking “Mark All”. In most cases, this will reconcile the account for that month and show a $0 difference in the reconcile window. If there is a difference, and it is not obvious what amount(s) is throwing it off, use the “Unmark All” button and reconcile one by one with the statement.)
As you can see, if the deposits in the “Make Deposit” window are a lot – possibly spanning multiple years, the above-mentioned method of clearing the deposits from the “Make Deposit” window would be very time consuming and impractical.
If there are a multitude of deposits here is what you do:
Too Many Deposits Fix
1) First, you want to check to see if the deposits that were previously entered directly into the bank register that made the accounts reconcile, and the invoice that the payments in the “Make Deposit” window are for, went to the same Income account. So, locate the previous deposits as well as the corresponding Invoice(s) and check to see where they went. (If there is only one Income account, then they most likely went to the same account).
2) Go ahead and make the deposit(s) for each year, using the year end date for each year’s total deposit. (It’s always good practice to make adjustments at the beginning or ending of a period).
3) Next, create a journal entry for each year end with the total deposit amount you just put in for each year.
- Debit the Income Account associated with the deposit(s)
- Credit the bank account that the deposits were made to
This will reduce the amount in the bank account as well as the Income account – as it should, and the “Make Deposit” window will now be cleared. When next you go to reconcile, the journal entry amounts for the deposits will be in the reconcile window. Check each on the debit and corresponding credit side to remove them from the reconcile window. This of course will be a zero effect on your current reconciliation.
Because there were transactions left in the undeposited funds, the revenue for the period(s) associated with those deposits were overstated. It is possible that they were already taken care of by the CPA or tax preparer as far as tax filing; however, you will need to bring this to their attention if taxes were already filed for the affected period(s). Although you have already corrected this on the books in QuickBooks, amended returns may need to be filed, to make the correction tax-wise.
Using the “Too Many Deposits Fix” option above will allow your financials to be accurate, but not your books in the sense that the deposits were not broken down in months which will throw monthly reports off. Using the “Few Deposits Fix” option above will allow your books as well as your financials to be accurate on either the cash or accrual basis.
by Marie | Feb 23, 2016 | Banking Setup & Management, Bookkeeping 101, QuickBooks for Mac, QuickBooks for Windows, QuickBooks Online, Reconciliations
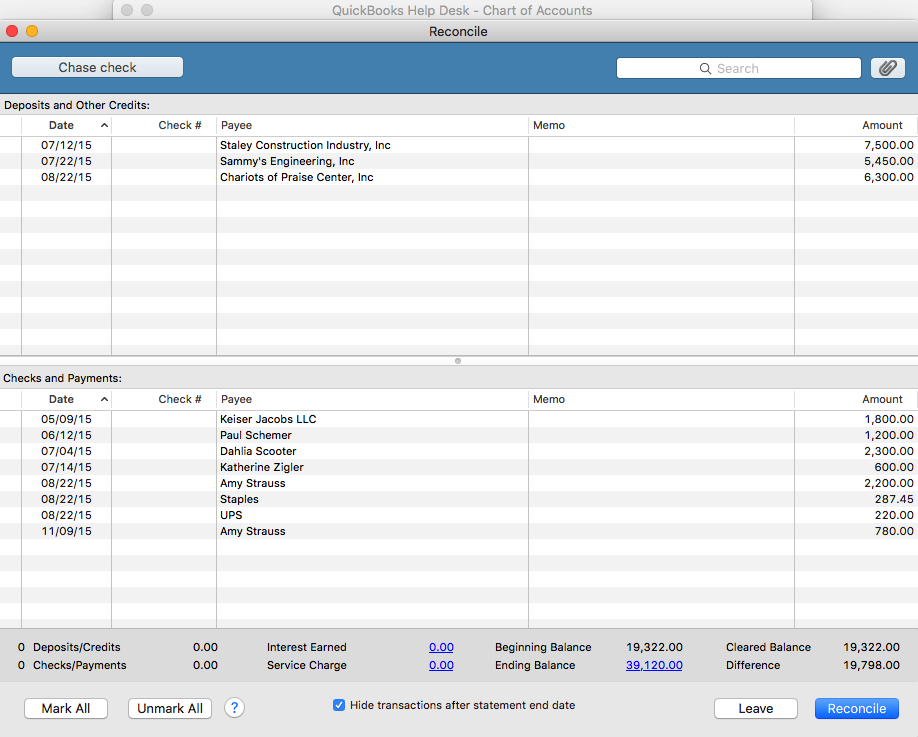
If you are using QuickBooks Pro for Mac or Windows, go to Banking then Reconcile and select the bank account you are looking to reconcile from the dropdown menu. (If you are using QuickBooks Online, click on the gear icon at top right of screen where your company name is, then Reconcile and select the bank account from the dropdown menu).
Next, enter the statement ending date and the statement ending balance, and the bank service charge and interest earned – if any. The beginning balance should be the same as the beginning balance on the statement. If it is the same, click ok and start your reconciliation process. Click on each item that matches with the same item on the statement for both debits and credits. You may also check the button that says, “Hide transactions after statement end date” then select “Mark All”.
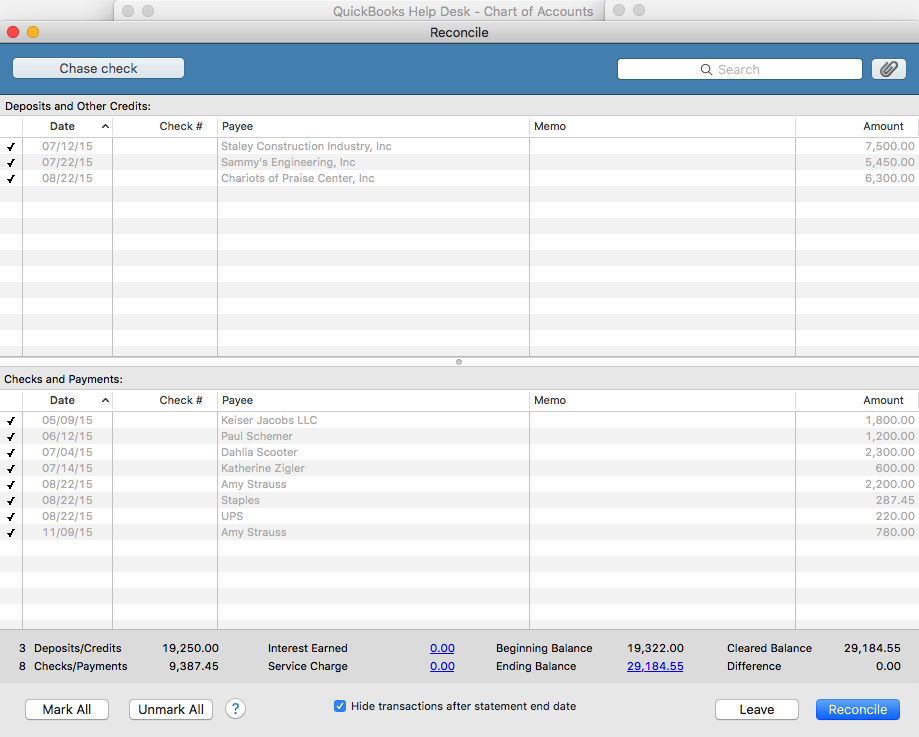
When your account is reconciled, there should not be a difference. The amount at the “Difference” button should show $0.00. If it shows a balance, it means that there is a discrepancy, and you will need to go over each transaction to locate the discrepancy. The difference could be one or more transactions that are entered with the incorrect amount such as $2,900 entered as $2,090, or a transaction entered on the debit side when it should have been on the credit side – and vice versa.
Also, a good thing to do at this point, is to double check to ensure the beginning and ending balance in the reconcile window matches with the beginning and ending balances on the bank statement. You may click the “Unmark All” button so you can mark them individually as you cross check each item with your statement.
If you recognize the transaction that is causing the discrepancy, and feel that you have already entered it, use the “Find” feature to try and locate it. Go to Edit then Find and search for the amount. It may have been mistakenly entered with the wrong date and thus hiding in another month or period.
If you previously did a reconciliation and it was accurate, and now you want to continue reconciling current months but the beginning balance is off, click on the “Discrepancy Report” button to see what transactions were changed since your last reconciliation. If it was deleted, you will need to reenter it. If it was unchecked in the register – which makes it un-reconciled, you will need to recheck it in the register. After doing so, your beginning balance will be back on par with your statement again.
TIP:
I highly recommend using the “Download Transactions” feature in QuickBooks. Not only will it save you time entering data, but it will help you to avoid entering incorrect transaction amounts as well as making incorrect debit or credit entries.
by Marie | Feb 22, 2016 | Bookkeeping 101, Customer Setup & Management, QuickBooks for Mac, QuickBooks for Windows, QuickBooks Online
The way you record this payment will depend on your reporting method – Cash or Accrual. However, there is no Bad Debt in cash basis accounting and you therefore must be using an accrual basis system since there was a previous bad debt allocation.
The best way to record this payment is to enter a sales receipt. This will keep your books clean and will not affect historical data for periods already closed out. This payment will also be counted as this year’s income, as it should, when entered this way.
For Accrual Basis:
If you wrote off the original invoice as a bad debt in a prior year, you should enter a sales receipt – especially if sales tax is involved. The income should be recorded as “Other Income” instead of “Sales”, since the original “Sale” was recorded in a prior year and subsequently written off. The sales tax, if any, was also recorded in a prior period and was written off; however, it was never collected and possibly never paid to the state. The sales tax should be recorded as current, and paid with the next sales tax return and payment that is made. If the sales tax was paid to the state, it was probably adjusted or recovered in a later period when the original invoice was written off, which means the sales tax needs to be remitted to the state – again, since it has now been collected.
by Marie | Feb 21, 2016 | 1099 Contractor Setup & Printing, Generating & Prinitng Tax Forms, QuickBooks for Mac, QuickBooks for Windows, QuickBooks Online, Vendor Setup & Management
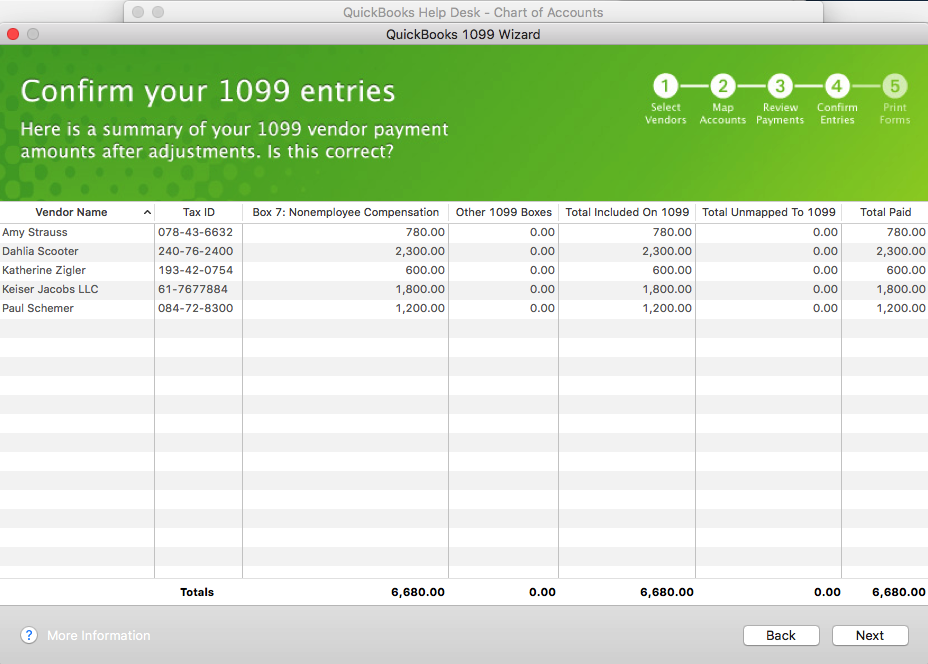
This is a question I have been asked multiple times during this 1099 preparation season, and as such have decided to address it here.
- In order for QuickBooks to generate your 1099 forms, you will need to ensure that the vendor accounts are accurately setup with the tax id option checked, and the account(s) used for each vendor mapped in the 1099 setup window notifying your QuickBooks to include them. Nothing will show up on the 1099 reports unless the vendor accounts are mapped, the tax id option checked, and the appropriate box chosen for each account mapped. Here is the Step by Step Instructions on how to accurately setup your 1099’s in QuickBooks.
- Another important thing to note, is that payments made to vendors using a credit card, debit card, or other third party payment network such as Paypal, should not be included on the vendor’s 1099 form. These companies will be sending their form 1099k to the IRS which will include the payments they made on your behalf. QuickBooks has made it easier to track and separate such payments; however, you have to ensure you include the payment number detail in the check number field when you enter vendor payments in QuickBooks. See Intuit’s Marking Payments for Exclusions from From 1099-Misc
According to Intuit, you can enter any of these notations in your check number field to identify to you what methods of payments were used, as well as allow QuickBooks to exclude payments from 1099’s based on information entered in this field. They are:
- Debit
- Debitcar
- DBT
- DBT card
- DCard
- Debit cd
- Visa
- Masterc
- MC
- MCard
- Chase
- Discover
- Diners
- PayPal
Also, I recommend generating a “Transaction by Vendor” report for each vendor to ensure that the numbers tally with the 1099’s before printing them. You want to ensure accuracy in all aspects of your business.
by Marie | Feb 21, 2016 | Bookkeeping 101, Chart of Accounts Setup & Management, Personal and Business Expenses, QuickBooks for Mac, QuickBooks for Windows, QuickBooks Online, Reimbursements and Investments

The correct way to enter business expenses that you have paid for with your personal credit card, debit card, or cash in your company’s QuickBooks, will be based on whether you want to invest this money in your company or reimburse yourself for it, as well as the type of business structure your company is setup as – Sole proprietor, Single member LLC, Multi member LLC, or Corporation. With QuickBooks, there are usually more than one ways to deal with various scenarios. Here are a few to deal with this one:
Option 1 – Reimburse Yourself
- Setup yourself in QuickBooks as a vendor and create a bill for your expenses, allocating them to the relevant business expenses the funds were used for. Then, pay yourself with a check using the “Pay Bill” feature when you are ready to take your reimbursement. This option can be used regardless of your business structure.
- Create a Current Liability account and call it something like “Owed to Owner”, then enter the transactions in this account where the credit card and other expenses will be easy to track in the event of an audit, with the exact amounts and vendor details listed. You will then write a check to yourself using this current liability account in order to clear the balance and reimburse yourself. This option is not suitable for a Corporation.
- Fill out an expense report just as you would expect any other employee to do, in order to be reimbursed. All receipts that are company related that the funds were used for, should be attached to this expense report so that all vendor details are part of the company records. In addition, keep a copy of the personal credit card statement in the business files to serve as backup for the expenses. Then, write a check for the expense report total, allocating each expense to its relevant company expense. This option is most suitable for a Corporation. (NOTE: Use the “Write Check” feature only if you are paying the full reimbursement. If you will be taking the reimbursement in portions, you should create a bill with all the expenses listed, then use the “Pay Bill” feature to pay the portion of the bill you want to receive. When you are ready to reimburse yourself for the balance, you will again use the “Pay Bill” feature to complete the payment. Also, be sure to keep receipts as backup for the cash purchases you make with your personal funds on behalf of your business.)
Option 2 – Invest the Funds in Your Business
- Create a Current Liability account and call it something like “Owed to Owner”, then enter the transactions in this account where the credit card expenses will be easy to track in the event of an audit, with the exact amounts and vendor details listed. Next, create an Equity account and call it something like “Owner Contributions”, and transfer the total of all the transactions in the current liability account to this Equity account to invest it in your business. This option is not suitable for a Corporation.
- Create a Liability account and call it something like “Loan from Shareholder”, then enter the individual transactions in this account, so that you will be able to allocate each to its relevant expense. Next, create an Equity account and call it something like “Shareholder Investment”. When you are through entering the transactions in the “Loan from Shareholder” account, transfer the total balance to the “Shareholder Investments” account. This option is most suitable for a Corporation.
Mixing personal funds with business funds is never a good idea! Avoid co-mingling funds at all cost – especially for a Corporation. You could expose yourself to the kind of liability you formed the Corporation to avoid, in the first place.
Get The Help You Need: Sign Up For “One on One” QuickBooks Training:
by Marie | Oct 24, 2014 | Company Setup & Management, QuickBooks for Mac, QuickBooks for Windows, QuickBooks Online
I got a call a few days ago from a concerned small business owner saying that some of the transactions she is entering into QuickBooks is simply disappearing and nowhere to be found. When I got there she opened the QuickBooks file in question, and indicated to me all the transactions she entered and where they should have been. I told her not to worry that I would find the transactions especially because it is impossible for them to just vanish into thin air. Possible Scenarios:
- Work is being done in more than one backup files of the same company, and the transactions in question were entered in more than one – depending on which was opened at the time data were entered. (Only with Mac)
- More than one company files were created for the same company, and transactions were entered into more than one – alternately – depending on which was opened at the time data were entered.
- The company file was replaced or overwritten by an older version of the file when a backup was restored. (Only with PC)
I have been using QuickBooks for such a long time that it did not take much time for me to realize that there had to be another file housing the “missing” transactions, and so I set out to view the other QuickBooks files that were on the Mac. Sure enough, the transactions were entered in three different QuickBooks files. There were like 10 transactions in one file, which were possibly entered in one sitting, then the next 17 in another, and another 38 in the next. That is one very big difference between the Mac and PC versions of QuickBooks; unlike the PC versions, each time QuickBooks is backed up on a Mac, it creates a different backup file with an image titled “Disk Image”. This makes it particularly easy to use a different QB file each time an update is done, without actually noticing until you really need to. To prevent this happening again:
- Always open the file (of the company in question) from within QuickBooks (instead of the desktop or wherever the file is stored) by going to File, then Open Recent and selecting the file on top, which would be the most recent file used.
- Turn of automatic backup so it does not create multiple backup “Disk Images” which can be quite confusing (Mac users). To do this, go to QuickBooks and select Preferences, then in the Preferences window double click Backup. This will then take you to a new window with backup options. Uncheck all boxes to turn off automatic backup, or you can customize to suit your needs. I usually only check the Overwrite last backup box, which is not a wise choice for someone prone to making mistakes.
- If you would prefer to keep the automatic backup running, and also open your files from wherever they are stored (instead of within QuickBooks), be sure to view the date each file was last modified and continue to use the one with the latest modification date.
So, this is what I did! I deleted all the QB files “Disk Images”, leaving only the one that was last modified which was also the one that most of the “missing” transactions were entered in. I then edited the backup preference and selected the option which was best suited to her, and that was, allowing manual QuickBooks backup instead of automatic. When she is ready to backup, she will then go to File, then Back Up…, and select the location (desktop or document) and file she would like to backup to.
Mission accomplished! Problem solved!


Recent Comments